/


Latest Post

Retro style circles layout; super easy! Catch the Live video tonight!


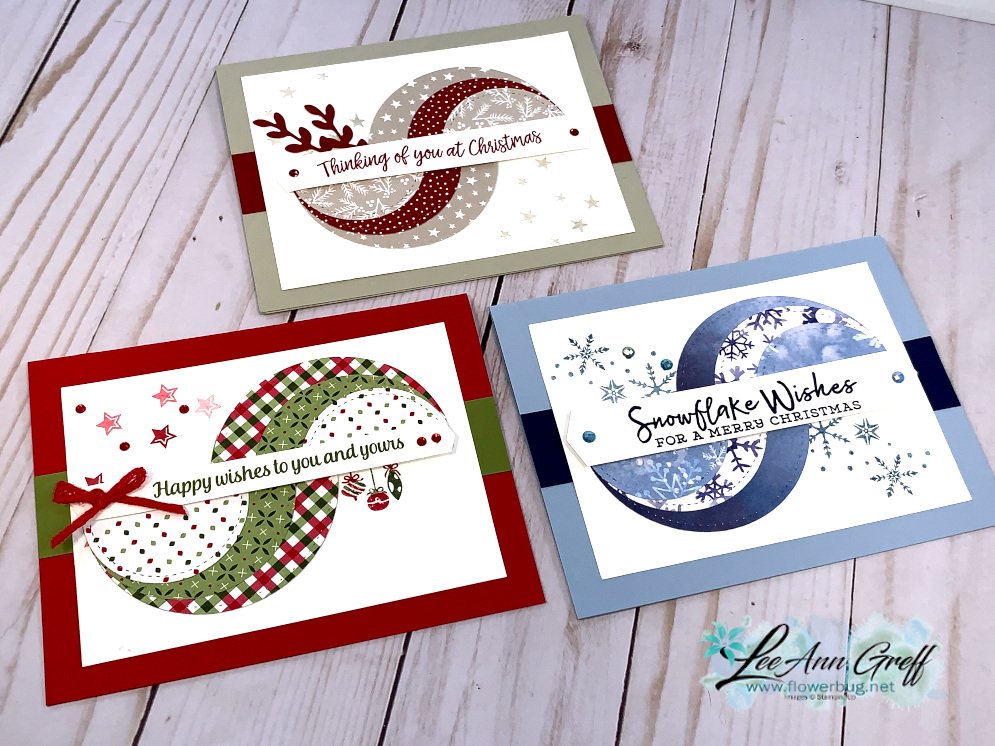
Tonight at 7:30 pm Central Time I'm sharing how to make these retro style circle cards on Facebook Live.  Click here to join me.   You can also see this video below!

Basically you need three sizes of circle dies or punches for the start of this layout.  Cut them in half and layer together with the edges meeting on one side. Adhere and add a long greeting between the two. 

Watch how on my FB Live replay!

Measurements:

  • 5 1/2" X 8 1/2" card base
  • 3 1/2" X 4 3/4" Whisper White; the greeting strip is about 5" long and either 1/2" or 3/4" wide depending on your greeting image.
  • 1" X 5 1/2" horizontal strip
  • Circles from the Stitched Shapes dies are the largest three circles. 

You'll want ink, stamps and embellishments that coordinate with your Designer Paper.  Remember you could use card stock instead of DSP. 

Products used:

  • Designer papers – Heartwarming Hugs, new Classic Christmas & Snowflake Splendor
  • Stamps – Tree Angle, Snowflake Wishes & Curvy Christmas
  • Colors – Real Red & Olive, Seaside Spray & Night of Navy, Sahara Sand & Cherry Cobbler  
  • Other: Stitched Shapes dies, Curvy Dies & Pick a Banner punch

~~~

November Specials!

Current Host code is GRC9VVUU


All online orders receive my FREE Curvy Celebrations 22 project PDF Tutorial! 

All Posts

  • Gorgeous Delicate Lace Thinlits on sale; while supplies last!


    This pretty card is a project we made at my Card Clubs in May.  I found it on Pinterest.  I just had to use some of these retiring items one more time before they're gone for good!  

    Retiring items:

    The Petal Pink & Champagne ribbon and the Magnolia Lane designer paper is sold out now but they do still have the bulk package.  It includes 20 sheets of two different double sided patterns of this pretty paper including the one I used here!  You can see it here. 

    My favorite deal on the Last Chance list are these gorgeous edgelit dies (seen here).  I cannot believe they're just $11.60 instead of $29 originally.  Remember they're on the list while supplies last! 


    ~~~

    May Specials


    Get my 'ALL Fun Fold cards tutorial' free with any online order.

    It includes directions, photos and measurements for 18 fancy card folds!


    May Host code is EYDJ4MQN

    Get a free pkg. of Noble Peacock rhinestones from me if your order is over $55. 

    Order online here

    Leave a Reply

    Your email address will not be published. Required fields are marked *

  • A Good Man double point fold card; it’s super easy!


    It was so nice to be able to meet and stamp with many of my Club members this month.  Our state has eased the guidelines for meetings so most of my gals chose to join me for Club this month.  Many of us really needed to get together and play/stamp again. 

    One of our cards was this Double Point fold card; it's super cool and so very easy!

    And it really makes the best use of your designer paper.  Not a bit of waste!  Each card needs two pieces of 3" X 4" designer paper.  Score it at 1" along the long edge and then fold each corner to the center of the fold like this: 

    I used the Come Sail Away designer series paper here; it's still available while supplies last here. 

    Here's a quick video for you on putting this card together.  I used the A Good Man stamp set and as you can see; you don't have to color in some of these sketch style images.  They're beautiful just as they are!

    Don't forget to subscribe to my YouTube channel while you're there!

    ~~~

    May Specials


    Get my 'ALL Fun Fold cards tutorial' free with any online order.

    It includes directions, photos and measurements for 18 fancy card folds!


    May Host code is EYDJ4MQN

    Get a free pkg. of Noble Peacock rhinestones from me if your order is over $55. 

    Order online here

    Leave a Reply

    Your email address will not be published. Required fields are marked *

  • Easy Seriously the Best Diagonal Strips cards


    I made these fun diagonal stripes cards on a recent Facebook Live.  It's so simple to do!  

    I used one of my favorite stamp sets; Seriously the Best here. I love the pretty bold font!  You can see it here.  It also coordinates with the Seriously the Best cards kit; which is 60% off! 

    I chose to use the retiring 6 X 6" 2019-21 In Color paper pack.  It's still available while supplies last and is sale right now here!


    The strips are 1" long; you need about two of each at 1" X 6".  Here's how to make it:

    • You'll need one piece of White CS measuring 4" X 5 1/4" to adhere the strips to.
    • Adhere two DSP strips across from end to end leaving a little space between the two.  Tip: 6" is a little short so I cut the Peacock strip in half and separated it a bit under the greeting.
    • Now you'll add short lengths of DSP perpendicular to the first two strips, alternating colors and leaving a bit of space between them all.
    • Now you can trim off the excess even with the original White CS piece.  
    • Adhere to your main card (5 1/2" X 8 1/2") 

    You might notice the cute little flowers on the greeting tags and that pretty, stitched die-cut.  Well these are new products coming out in the upcoming new Stampin' Up! Annual catalog!  The flowers are a new border punch and the dies are part of the Tasteful Label dies. 

    You can order these items on June 3rd! (or purchase the Stampin' Up! Starter kit and you can add them to your $125 in product!)  Read about that here. 

    ~~~

    May Specials


    Get my 'ALL Fun Fold cards tutorial' free with any online order.

    It includes directions, photos and measurements for 18 fancy card folds!


    May Host code is EYDJ4MQN

    Get a free pkg. of Noble Peacock rhinestones from me if your order is over $55. 

    Order online here

    Leave a Reply

    Your email address will not be published. Required fields are marked *


Notice: LeeAnn Greff, Independent Stampin’ Up! Demonstrator, Manager. The content of this website is my sole responsibility as an independent Stampin’ Up! demonstrator and the use of, and content of, the classes, services, or products offered on this website is not endorsed by Stampin’ Up! Copyright 2025