/


Latest Post

Nuts About Squirrels Z-Fold card!


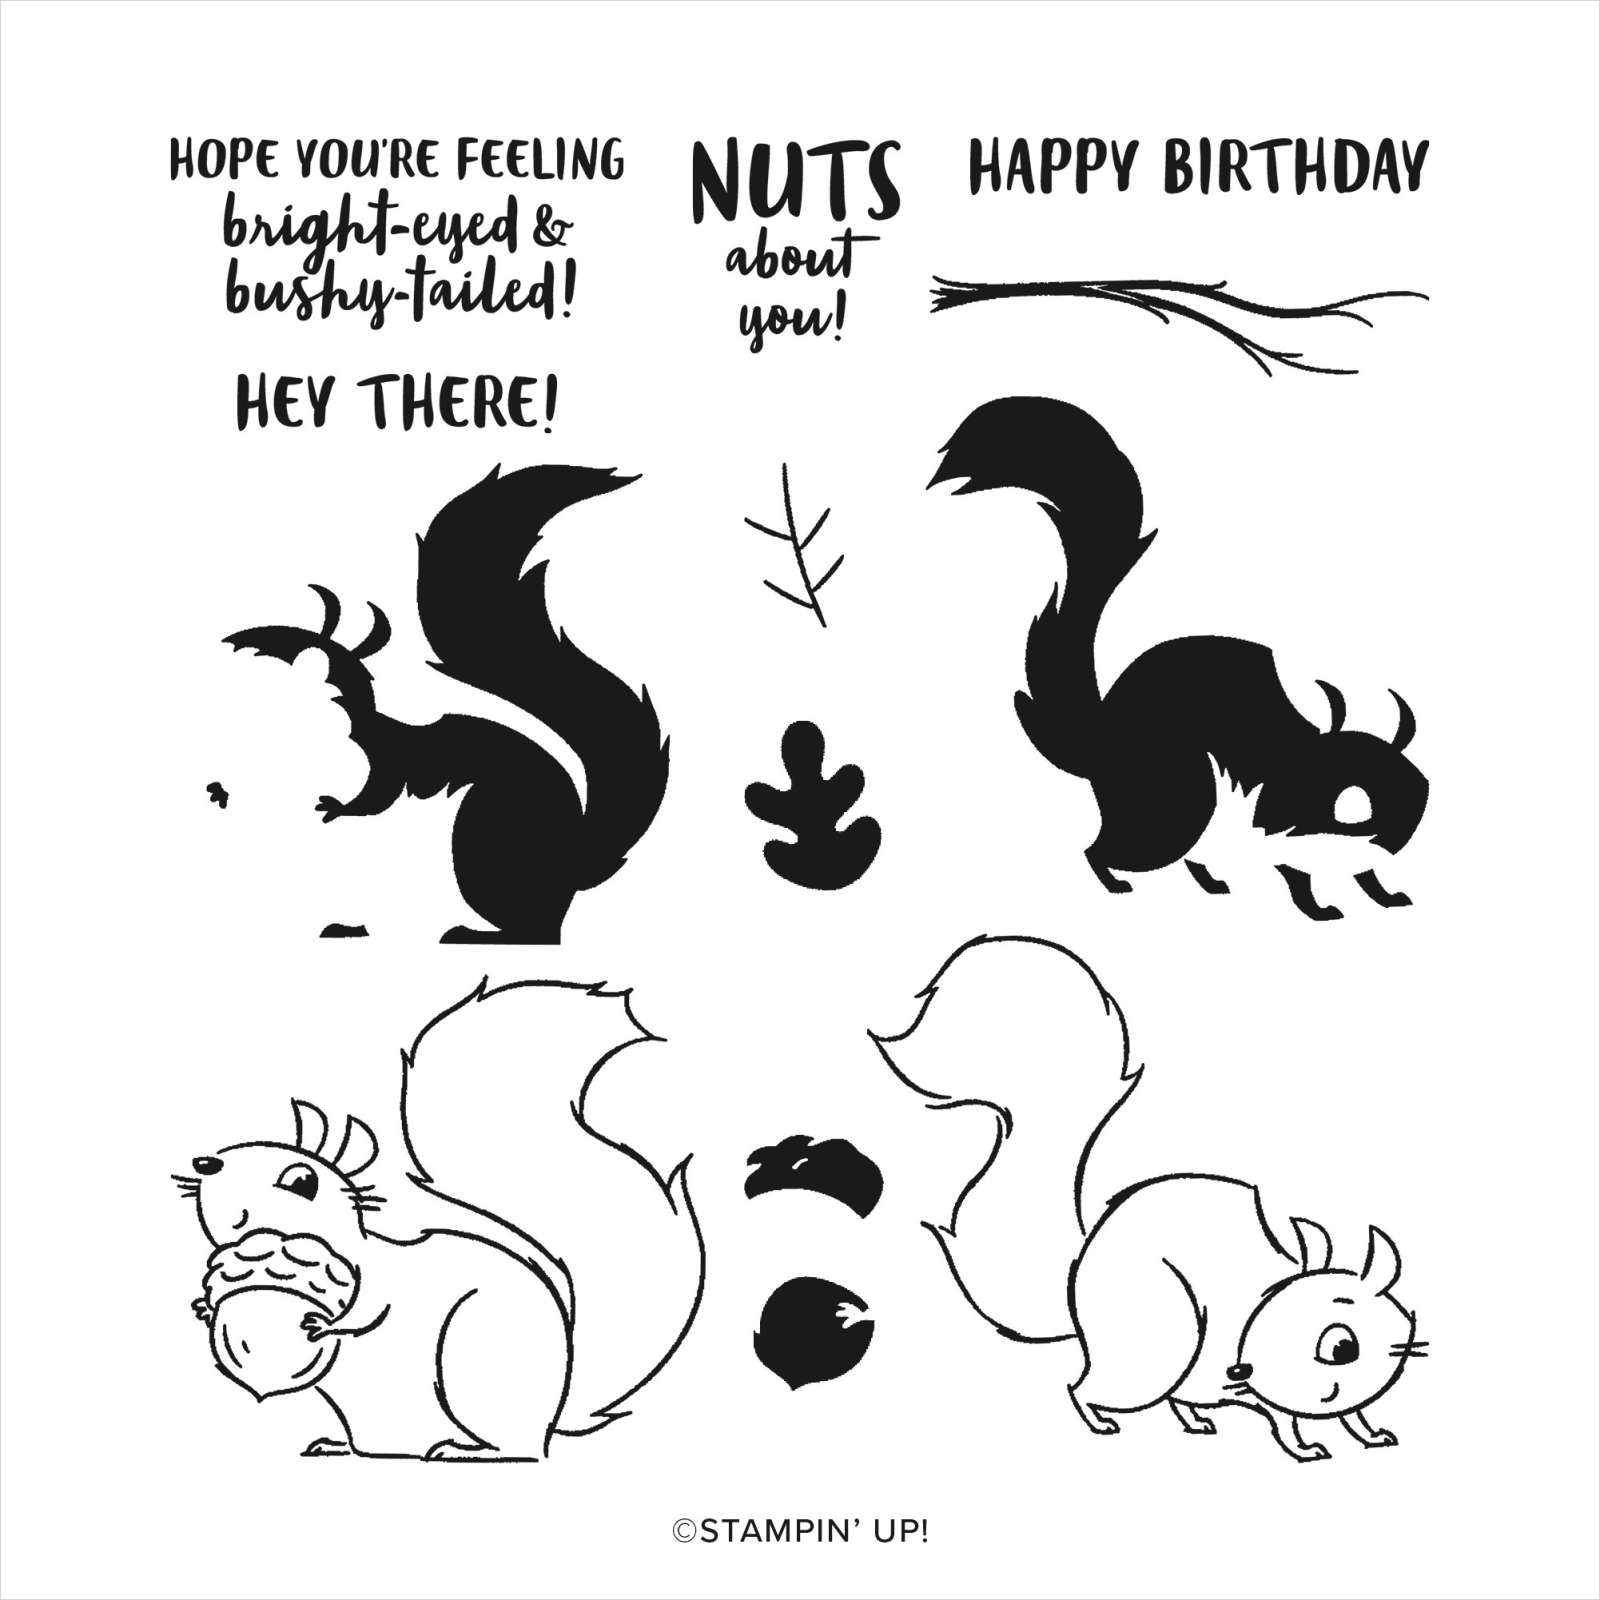
The Nuts About You stamp set is just plain cute!  It's a 2-step set as you can see.  The squirrels, leaves and even acorn have two images each so there's no need to color!  

I created this card for our Flowerbug's Team swap in September.  Our theme was Fall or Halloween.  

Card stock & ink colors are Cinnamon Cider, Early Espresso, Very Vanilla, Crumb Cake, Pumpkin Pie, Pear Pizzazz

See that little surprise pop-up circle inside?  That's attached with a thin strip of window sheet and adhered to the inside of the Early Espresso strip. 

Measurements:

  • Cinnamon Cider 4 1/4" X 11" scored at 2 3/4" and 5 1/2" & scrap for die-cut greeting
  • Early Espresso 1 1/2" X 11" scored at 2 3/4" and 5 1/2" & 3 1/2" X 4 7/8"
  • Very Vanilla 3 3/8" X 4 5/8", 2 1/8" X 3" tall for inside plus a small circle

~~~

October Specials

Host code: G3FX9NGA

*click here to order

Get a free package of Gold & Rose Gold Metallic specialty paper from me with a $50 online order in October! 

All online orders will receive my October PDF tutorial free! 

This month it features the Gingerbread & Peppermint suite.

*click here to order

Get a free package of Gold & Rose Gold Metallic specialty paper from me with a $50 online order in October! 

All online orders will receive my October PDF tutorial free! 

This month it features the Gingerbread & Peppermint suite.

All Posts

  • Fabulous card made with the Slim Card dies; they’re 50% off!


    This is one of the cards we made at my May card clubs. It features the Slim Sayings bundle in the retiring Jan-June catalog by Stampin' Up!  

    However, right now the dies are on sale at 50% off with the Last Chance list. See everything on sale here.  

    My card base is White and I added a piece of Sun Prints Designer Paper behind the chevron die-cut.  Scroll down for measurements and the video too. 

    Did you know we have Slimline Envelopes that perfectly match these dies and a typical slim line card?  They carried over into the new Annual Catalog too.  They come in 3 colors; White, Smoky Slate & Soft Succulent. See them here.  

    I used the Slim Saying stamp set along with the Nature's Prints bundle from the new 2022-23 Annual Catalog.  See the Slim Saying stamp set here and the Nature's Prints bundle here. 

    At club they chose either a birthday card or a graduation card; it works for both. And some made theirs into a wedding or anniversary card! 

    The Slim Saying stamp set & Slim Card dies are both retiring and are while supplies last.  I'll be sharing more cards with this bundle today on my FB Live here at 11 am CT and also this week right here on my blog.  

    Measurements:
    White card base 8 1/2" X 7 1/4" scored at 3 5/8", White for die-cut 3 1/2" X 8 1/2", greeting 4 1/2" X 5/8"
    • Soft Succulent for greeting layer 3/4" X 4 1/2" & scrap for leaf die-cut
    • Smoky Slate scrap for fern die-cut
    • DSP 8 3/8" X 3 3/8"

    Click on the photo below to watch the video. Or click here to see it on my YouTube channel.  

    ~~~

    Last Chance List is out!  


    Kits Collection BOGO – buy 1 get 1 50% off!  

    Host codes: CZARP9KR or Y23VZ9UC

     *click here to order 

    If your order is over $50 you'll receive a set of Solid Faceted Gems from me.

    Earn free products with my loyalty rewards! 

    Click here to download yours and earn a $50 shopping spree!  


    Opt in for my New Catalog Designer Paper Share

    It's $26 plus shipping

    Leave a Reply

    Your email address will not be published. Required fields are marked *

  • I’ve got more ideas yet! Botanical Layers bundle cards with video


    I challenged myself to use each pattern of the vellum included in the Lovely Layers vellum.  You can see it here; you get 60 sheets in the pack!  It includes 4 different prints and many sheets of plain vellum too. 

    This first card has a printed circle on it.  The easy solution was to add a die-cut wreath.  I used three sets of dies here; the Natural Prints, Amazing Thanks & Hydrangea dies.

    My colors are Parakeet Party, Fresh Freesia, Black & White.  The vellum in the kit is 1/4" larger than the 4 3/4" X 3 1/2" white layer. 

    Remember that it helps to place a White layer under your vellum to see it's true color.  

    Here are two cards; both using the Lovely Layers Vellum.

    For this card I textured it with the new Quatrefoil Tile embossing folder.  Embossing vellum is a wonderful way to add it to your projects; it's texture and opaqueness is so beautiful. 

    The colors are Polished Pink & Parakeet Party.  I used the Poppy Moments and Natural Prints dies for the greenery and the Nature's Prints stamp set for the stamped leaves and greeting. 

    Click on the photo below to watch the video and see more ideas using this bundle. 

    ~~~

    Last Chance List is out!  


    Kits Collection BOGO – buy 1 get 1 50% off!  

    Host codes: CZARP9KR or Y23VZ9UC

     *click here to order 

    If your order is over $50 you'll receive a set of Solid Faceted Gems from me.

    Don't forget about my loyalty rewards! 

    Click here to download yours and earn a $50 shopping spree!  


    Opt in for my New Catalog Designer Paper Share

    It's $26 plus shipping

    Leave a Reply

    Your email address will not be published. Required fields are marked *

  • 2 more Botanical Layers card ideas!


    Once I started I couldn't seem to stop creating with the Botanical Layers stamp set.  I made this card for an online swap:

    It's a Dutch door monochromatic card in Orchid Oasis.  Do you like these type of cards as much as I do?  I find cards with one main color very soothing to the eye and just plain pretty!  

    I stamped the main image multiple times without reinking.  I love that about our inks; you can get multiple hues with one color. 

    Details:

    • The card front opens at the bottom only.  
    • I used the Stitched Greenery die for the inside White layer.  
    • There is a half circle of Orchid Oasis ombre glimmer paper at the top with the bow.  
    • The tag is from the Tea Cup dies; the greeting is from the Cup of Tea stamp set. 

    Measurements:

    • Card base 5 1/2" X8 1/2"; score at 4 1/4" then trim off at 2 3/4" up to the top of the card.  Save this piece for the front layer
    • Front layer (cut from the card base) is 2 3/4" X 4"
    • White front is 2 1/2" X 3 3/4"; inside is 4" X 5 1/4" 

    This next card was made with the Inked Block technique. 

    Here's how:

    • I colored an 'H' block with Stampin' Write markers in Starry Sky, Orchid Oasis & Tahitian Tide. 
    • Then I spritzed alcohol on it (you can use water; alcohol dries faster) and pressed it onto my White CS and let it dry. 
    • Lay a piece of copy paper over it and set something heavy on it so it dries flat. 

    After it's dry I stamped the botanical image in Starry Sky ink and used the Timeworn Type embossing folder.  

    The greeting is also from the Botanical Layers set; the die-cut is from the All That dies. 

    You can see a video on this technique here. 

    ~~~

    Last Chance List is out!  


    Kits Collection BOGO – buy 1 get 1 50% off!  

    Host codes: CZARP9KR

     *click here to order 

    If your order is over $50 you'll receive a set of Solid Faceted Gems from me.

    Don't forget about my loyalty rewards! 

    Click here to download yours and earn a $50 shopping spree!  


    Opt in for my New Catalog Designer Paper Share

    It's $26 plus shipping

    Leave a Reply

    Your email address will not be published. Required fields are marked *


Notice: LeeAnn Greff, Independent Stampin’ Up! Demonstrator, Manager. The content of this website is my sole responsibility as an independent Stampin’ Up! demonstrator and the use of, and content of, the classes, services, or products offered on this website is not endorsed by Stampin’ Up! Copyright 2025