/


Latest Post

Inlaid technique video with Mountain View!


This gorgeous card was one of our January Card Club projects.  Of course I love the colors of Coastal Cabana, Granny Apple Green and Pretty Peacock. 

I cased the idea from Cheryl Miller at Sense of Whimsy. 

Here's how to make this pretty card. 

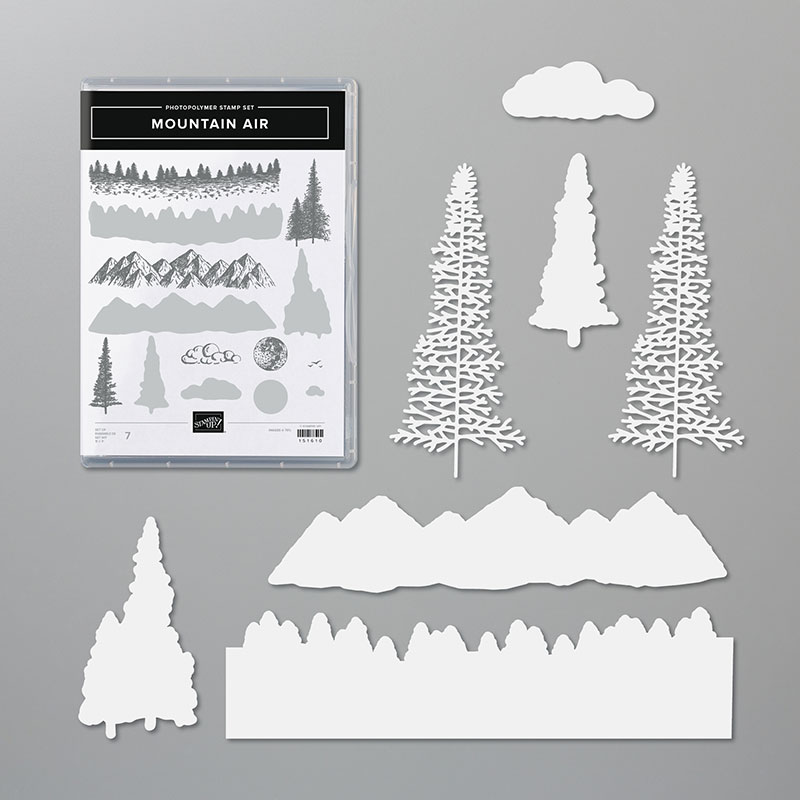
  1. First die-cut two trees from the main White panel one on the upper left and one on the lower right.
  2. I sponged one of these die-cut white trees with Coastal Cabana and Granny Apple ink for the center tree. 
  3. Then die-cut two more trees from the Lily Impressions designer paper (free with a $50 order during Sale-a-Bration).  
  4. Adhere the White panel to the Coastal Cabana panel and then to the main Green card base. 
  5. Insert the two die-cut trees into the left and right die-cut areas for an inlaid effect.  (I recommend Fine Tip glue or Multipurpose adhesive)
  6. There's a trick to getting this unique greeting shape with the Tailored Tag punch.  I share it on the video below. 
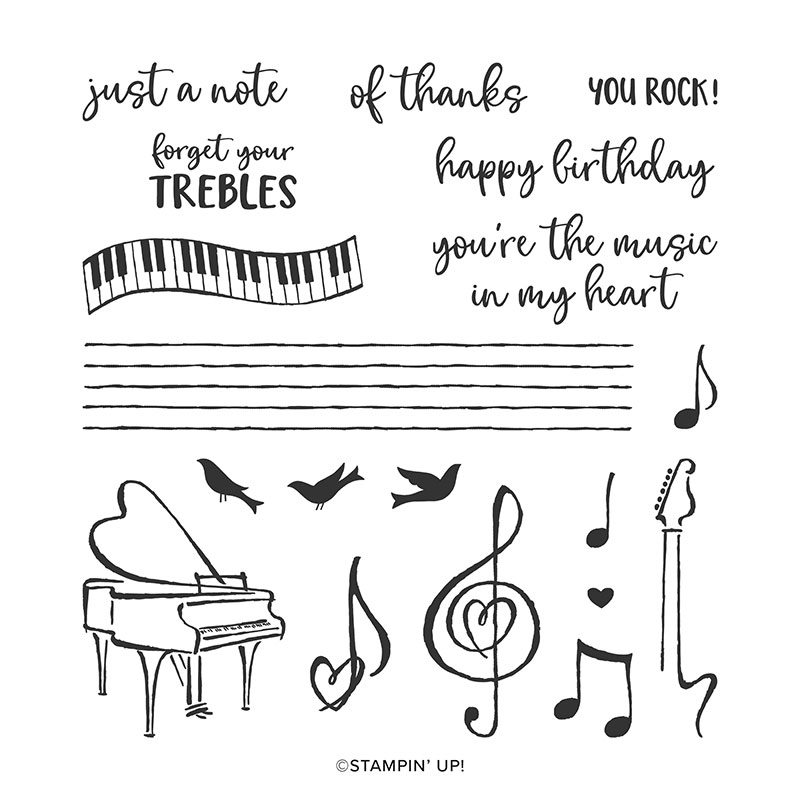
  7. I used the Sending you Thoughts stamp set and heat embossed the greeting. 

Watch the video below for many more tips on creating this fabulous card. 


The Mountain Air bundle is my special for March.  Everyone who purchases it from me will receive a free 10 cards tutorial!  Past and present orders count!  You can see it here. 

Coordination Product Release – While supplies last!


~~~

Four February Specials just for you besides Sale-a-Braton

and the Product Coordination Release! 

    1. Earn a ticket in the drawing for each $25 you order online in February for a free Little Ladybug stamp set!

Order online here

2. All online orders will receive a free pdf cards tutorial in an email.

3. And if your order is over $55 you'll get a free package of Champagne Rhinestones too!

February Host Code is 4CQKPWRV

Order online here

4. Choose any FREE stamp set when you purchase the Starter kit during Sale-a-Bration; of any value! Plus you'll get a free paper trimmer and a 6 X 6 sampler of new Designer Paper!  It's just $99 plus tax for $125 in product of your choice plus shipping is free!  Click here to join my awesome Flowerbug's Team! 


All Posts

  • Fun Latch Fold card with Music From the Heart


    I had to use my friend Dawn Olchefske's new stamp set for January club. It's the set she designed for her million dollars in sales achievement!  It's a fabulous music themed set called Music From the Heart.  Look!

    Look at this fun latch fold card!


    The Classic Label punch is perfect to create the 'latch' for this card closure.  We did have to widen the opening a bit by punching off to the side an extra 1/4" on each side as I wanted a larger front layer than the punch allows for.  If you watch the video below you'll see what I am referring to.  

    I decided to offer a choice of card themes for my gals; Valentines, Anniversary and Birthday.  I used the Heart to Heart set for the Valentine's greeting. This pretty foiled paper is called From the Heart specialty designer paper.  You can see it here. 

    Did you know that you can 'play or stamp' Happy Birthday with the individual notes in this set?  Isn't that the best idea ever?! Although creating a 'guitar' from two stamps in this set is even more clever! If you have a musical person in your life you need this set! 

    Be sure to watch my video to see how to make this fun fold card.  It's amazingly easy! 

    Measurements:

    • Real Red 4 1/4" X 8 3/4" scored at 5 1/2"
      White inside 4" X 5 1/4", front and inside flaps 2" X 3 3/4"
      Black 2 1/4" X 8" scored at 4"
      From My Heart Specialty DSP 3" X 4"

    ~~~

    Three January Specials just for you besides Sale-a-Braton! 

        1. All January online orders will earn a ticket in the drawing for a free Little Ladybug stamp set!

    Order online here

    2. All online orders will receive a 10 cards pdf tutorial in an email.

    3. And if your order is over $65 you'll get a free Coastal Weave embossing folder too!

    January Host Code is GEEFZCZV

    Order online here

    Leave a Reply

    Your email address will not be published. Required fields are marked *

  • Sponge Brayer on an embossing folder? Cool effect!


    Have you ever used a sponge brayer?  Did you even know we carry them?  We do!  On page 181 of the annual catalog. Click here to see them. 


    I used Pool Party ink and the sponge brayer to add ink to the flat side of the Parisian Flourish embossing folder seen here.  Then I inserted my card stock or envelope flap into the folder and ran it through the machine.  Super easy!  Then just rinse the ink off your embossing folder when you're done.  Our ink colors are water based so it comes off easily. 

    Click below to watch the video; it's at the end of this one below:

    I used another 'stitched heart' on the front of this card using the Heart Doilies seen here. The few die-cuts are from the Stitched Be Mine set of dies in the annual catalog. See those here. 

    I shared how to do this stitched heart doily in a previous FB live video.  Click here to see it.  It took me about 8 minutes to stitch and I do NOT stitch by hand much at all. Maybe once a year.  That should tell you it's easy! 

    ~~~

    Three January Specials just for you besides Sale-a-Braton! 

    1. All January online orders will earn a ticket in the drawing for a free Little Ladybug stamp set!

    Order online here

    2. All online orders will receive a 10 cards pdf tutorial in an email.

    3. And if your order is over $65 you'll get a free Coastal Weave embossing folder too!

    January Host Code is GEEFZCZV

    Order online here

    Leave a Reply

    Your email address will not be published. Required fields are marked *

  • Fancy Fold Accordion Heart Doilies!


    I dreamed of doing this fun accordion fold with the Heart Doilies in my sleep.  I rarely do that!  Do you?  


    I shared how in this week's Facebook Live yesterday.  My FB Live's are usually on Tuesdays at 11 am but I was out of town so switched to Wednesday this week.  It's so simple!  And you could do this with many of our dies too!  Click below to see it.

    I also traced the flap of my envelope onto the From My Heart specialty designer paper to make this card extra, extra special!  

    Details:

    • The pretty soft scallops on the edge of the DSP are from the new Braided Border punch.  I did one length of it and cut it in half for both cards. 
    • The greeting is stamped on a Timeless Label punch and added to another Heart Doily.  The stamps are from the Heart to Heart stamp set seen here. 
    • I used the new sparkly Faceted Gems from the From My Heart Suite.  See them here
    • You get 40 Heart doilies in one package for $5.50; a great deal at .14 cents each.

    Cutting:

    • I cut a strip of the From My Heart designer paper at 3" X 12" and cut that into two pieces 3" X 5 1/2" long.  The hearts are the reverse side of the pretty foil double sided designer paper on the envelope.  When you use these measurements you can get 8 cards from one sheet!  It's a great way to use up the designer paper you may be 'hoarding'. 
    • The white layer inside is 3 1/2" X 4 3/4"; my favorite size for inside cards as you can get 5 from one sheet of 8 1/2" X 11".  

    I folded each doily in half and glued each one to the next just on the outer curve.   I adhered the folded doilies to the card with either Tombo liquid adhesive or Tear & Tape; it's super strong!

    ~~~

    Three January Specials just for you! 

    1. All January online orders will earn a ticket in the drawing for a free Little Ladybug stamp set!

    Order online here

    2. All online orders will receive a 10 cards pdf tutorial in an email.

    3. And if your order is over $65 you'll get a free Coastal Weave embossing folder too!

    January Host Code is GEEFZCZV

    Order online here

    Leave a Reply

    Your email address will not be published. Required fields are marked *


Notice: LeeAnn Greff, Independent Stampin’ Up! Demonstrator, Manager. The content of this website is my sole responsibility as an independent Stampin’ Up! demonstrator and the use of, and content of, the classes, services, or products offered on this website is not endorsed by Stampin’ Up! Copyright 2025