/


Latest Post

Love of Leaves; make one cut and get two cards!


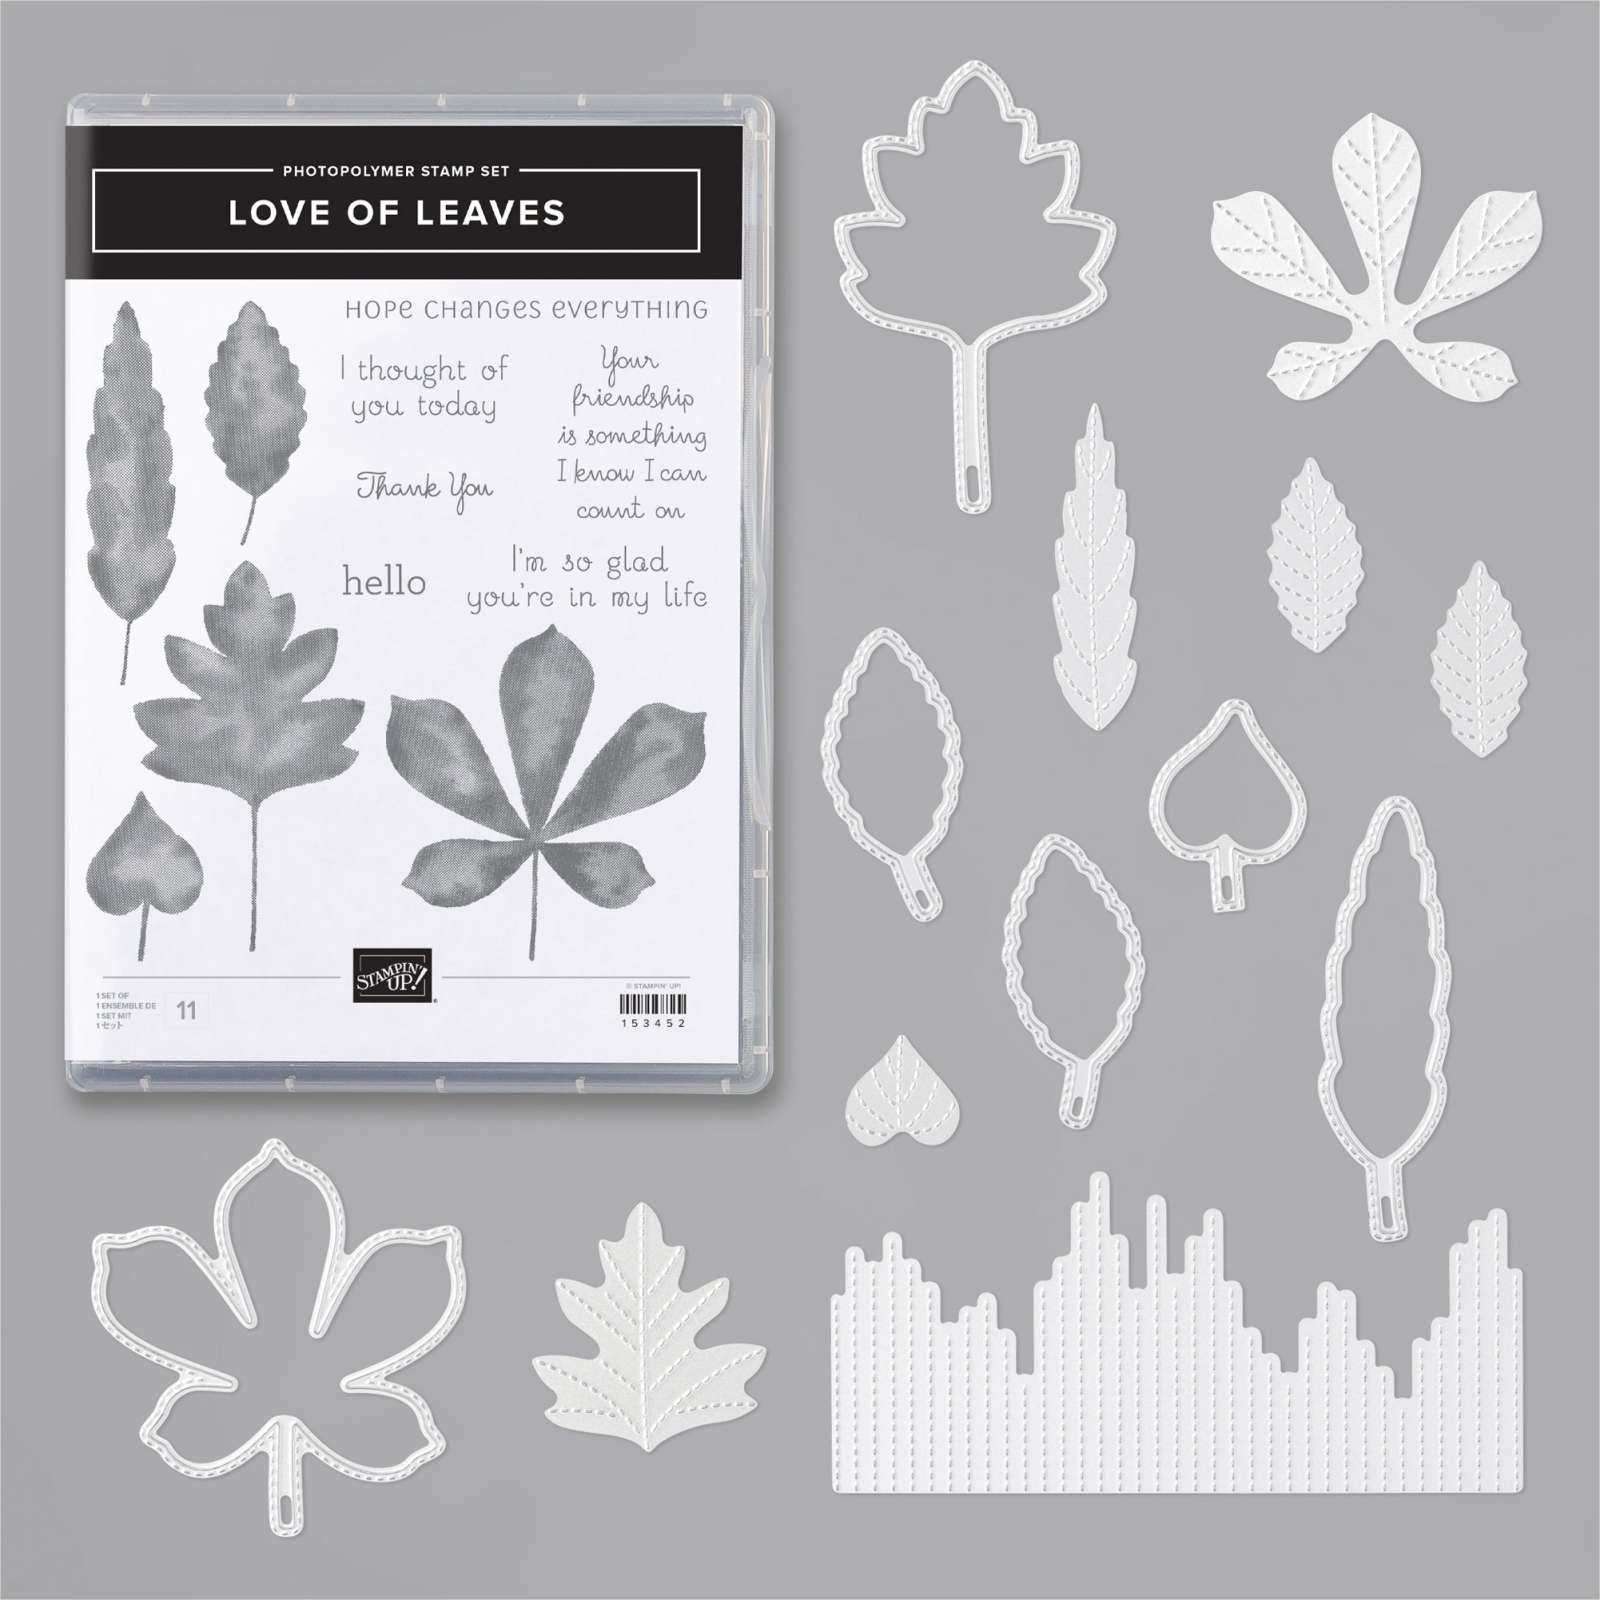
Last week I shared a card featuring the Love of Leaves bundle.  *You can see it below.  Now I'm sharing the other card I made with the inside of the die-cut.  Cut once and make two cards using these stitched leaf dies! 

The Love of Leaves bundle is going to be a big favorite this fall!  See it here. 

Details

  • The die-cut is Soft Suede and the card base is Cajun Craze. 
  • The Pretty Peacock designer paper is from the new Magic in the Night Halloween Designer Series paper seen here!  As you can see, it's not just for Halloween!  
  • I also used the new Celebration Label dies seen here; I love the stitched shape of these!  
  • The stamped leaves image is created with the Life is Beautiful stamp set.

Below you'll see the other card I made with the outside or window when I cut the leaf above.

Get the details on this card are here. 

~~~

Bonus Days are here!

 
Redeem your $5 coupons now!  

~~~

Current Host code is QW7SUYVX

Get a free package of new Iridescent Pearls in August with an online order over $55. 

Order online here

 Get my Flowers for Every Season pdf tutorial free with all online order in August!


It includes directions, photos and measurements for 12 cards!

All Posts

  • Nuts About Squirrels


    Look at this adorable card Candace made for our September swap! She used the cute Nuts About Squirrels stamp set.

    You can see this cute set here.  Can you believe she stamped that background herself?  Here colors include Pumpkin Pie, Crushed Curry, Soft Suede and Cherry Cobbler. 

    Other details:

    • She stamped the squirrel and fussy cut it out. 
    • the embossing folder is called Bark 3D

    Click here to see this stamp set online.  Here's the inside view: 

    ~~~

    October Specials

    Host code: YYUAWBVA

    *click here to order

    Get a free package of Gold & Rose Gold Metallic specialty paper from me with a $50 online order in October! 

    All online orders will receive my October PDF tutorial free! 

    This month it features the Gingerbread & Peppermint suite.

    Leave a Reply

    Your email address will not be published. Required fields are marked *

  • Christmas Card Fun-Folds kit to go – limited quantities!


    If you love making Christmas cards, learning unique fun fold designs & having things pre-cut and ready to go you will love this kit to go!  

    It features the pretty Peaceful Prints designer paper in traditional holiday colors.  Every card is a special fancy fold as well.  

    This pre-cut kit is now sold out. However you can get the PDF tutorial here. 

    This kit was an optional add on for my monthly kit subscribers.  If you'd like to receive a fabulous pre-cut kit each month click below to subscribe. It's $36.50 and always includes $20 in product, 10 pre-cut cards plus the PDF tutorial as well!


    See all of the items in my Kit & Tutorial shop here.  I also offer these handy glue stands as well. 

    ~~~

    October Specials

    Host code: YYUAWBVA

    *click here to order

    Get a free package of Gold & Rose Gold Metallic specialty paper from me with a $50 online order in October! 

    All online orders will receive my October PDF tutorial free! 

    This month it features the Gingerbread & Peppermint suite.

    Leave a Reply

    Your email address will not be published. Required fields are marked *

  • Angled Gate-Fold card with a latch closure; template & video tutorial


    I shared these cards last night on my Monday night Stamp with Me Live.  They're called Angled Gate-Fold cards.

    These first two cards feature the Painted Christmas designer paper, the Thinking, Thanks & Peace stamp set & Seasonal Label dies. The large greeting die-cut was cut smaller by cutting once and reinserting it to trim off a bit. (shared in the video) 


    On this card I added dimensionals to only the very left side of the greeting so it could work as a 'latch'.  The right side flap slips between the left side and the die-cut greeting to keep the card closed flat.  *Watch the video below to see how it's done.

    I created an easy template for both the card base and the additional designer paper layer.  

    One important thing to note about the template below for the DSP layer is to be sure to check the direction & side you prefer before trimming off the angles.  You can use this template for both sides; just trim off the opposite edge. 

    I'll share the other two cards I made on Thursday; they're totally different! 

    You can see this video here; click on this photo below to watch. 

    ~~~

    October Specials

    Host code: YYUAWBVA

    *click here to order

    Get a free package of Gold & Rose Gold Metallic specialty paper from me with a $50 online order in October! 

    All online orders will receive my October PDF tutorial free! 

    This month it features the Gingerbread & Peppermint suite.

    Leave a Reply

    Your email address will not be published. Required fields are marked *


Notice: LeeAnn Greff, Independent Stampin’ Up! Demonstrator, Manager. The content of this website is my sole responsibility as an independent Stampin’ Up! demonstrator and the use of, and content of, the classes, services, or products offered on this website is not endorsed by Stampin’ Up! Copyright 2025