/


Latest Post

Control Freak’s Blog Hop; Favorite Colors theme!


Welcome to the January Blog Hop from our talented Control Freaks group!  Our theme this month is to use our favorite Stampin' Up! color and make it monochromatic!  

If you just stopped in from Wendy's blog I'm sure you enjoyed her projects. She is super creative!

I haven't joined a blog hop in awhile and I've missed it!  This color theme was perfect for me as my Flowerbug's Team swapped monochromatic cards last week.  I've been sharing them here all week long.

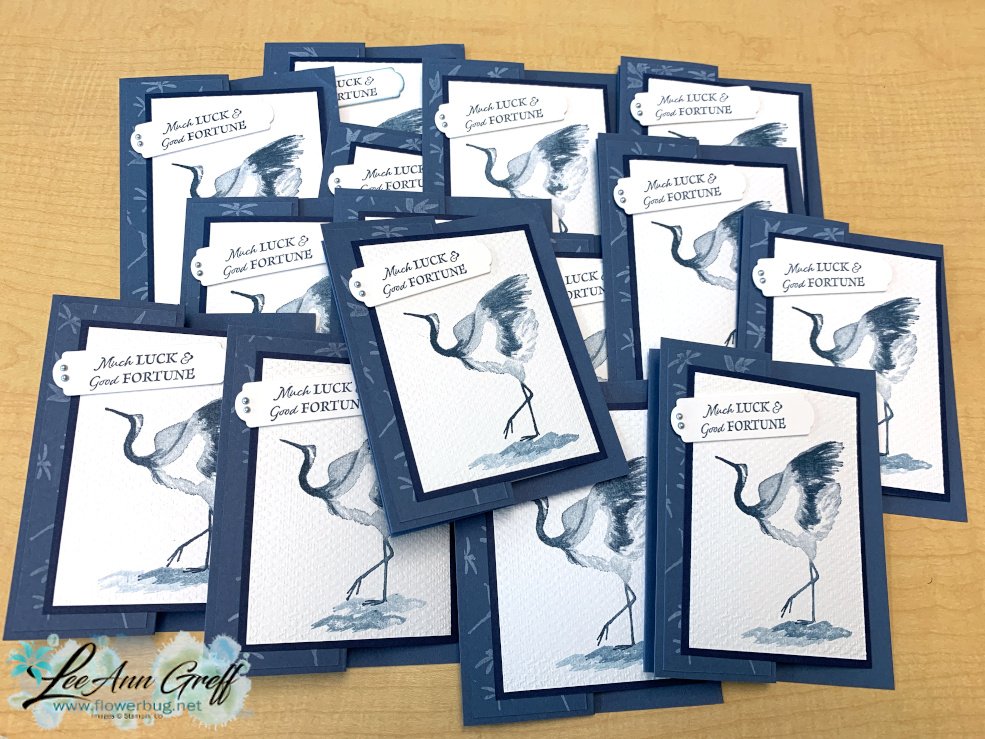
My first card features a new stamp set called Crane of Fortune.  
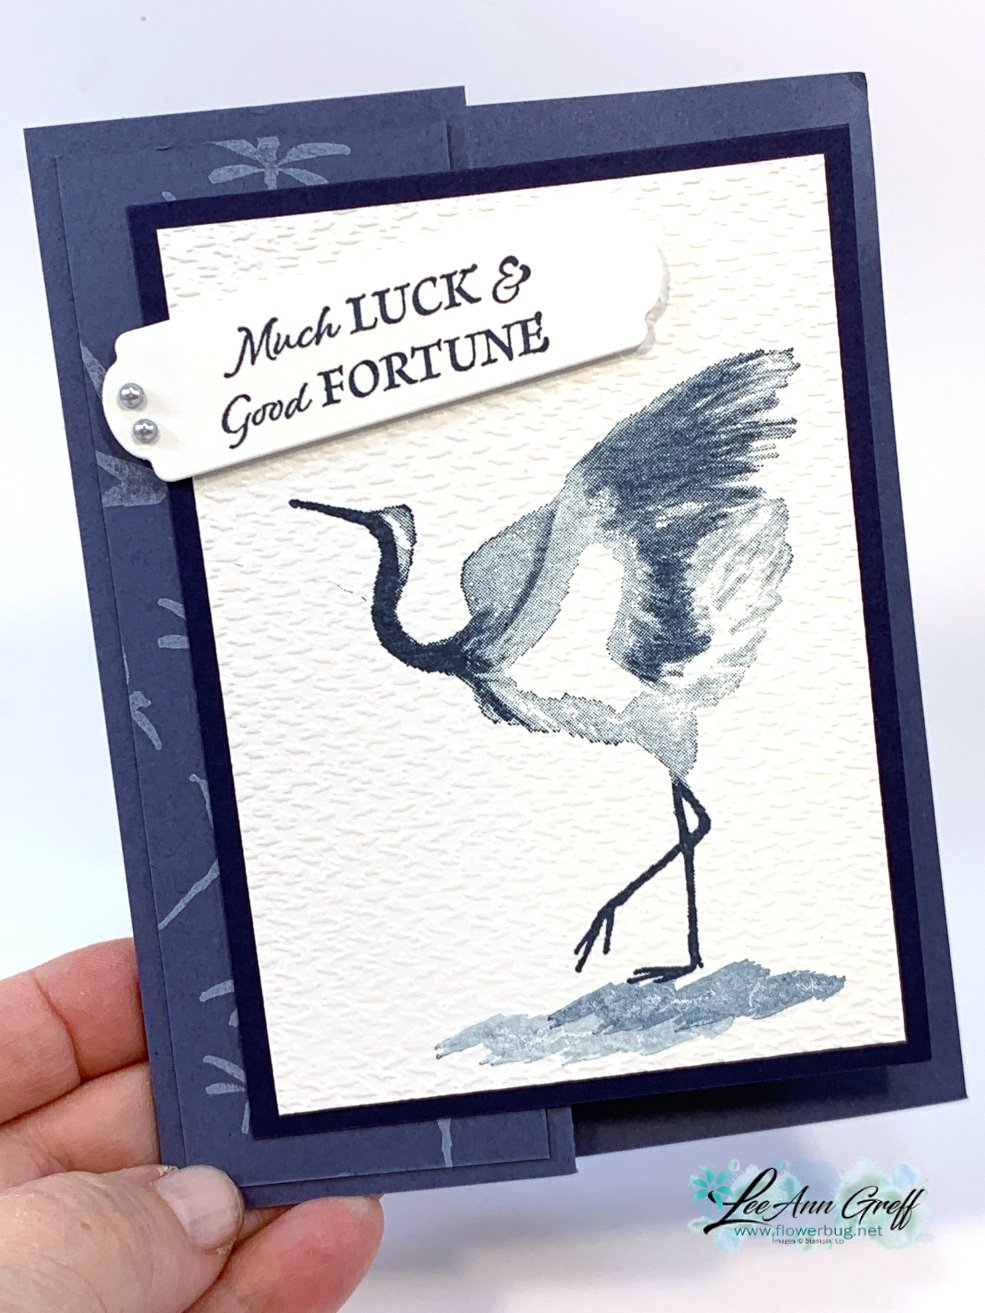
I chose to feature Misty Moonlight with Night of Navy & White.  The Crane of Fortune stamp set is new in our Stampin' Up! January-June catalog.  It's a Distinktive stamp set which means you get multiple hues of color with one inking.  These are my favorite type of stamps.  Look how pretty the images are in one color and so easy too! 

After I stamped the crane I textured it with the Tasteful Textile 3D embossing folder.  

This card is a very simple fun fold.  Here are the measurements:

  • Score your 5 1/2" X 8 1/2" card base at 2 1/8" & 4 1/4"
  • Misty Moonlight layer 1 7/8" X 5 1/4"
  • White layers are 3 1/4" X 4 1/2"
  • Navy layer is 3 1/2" X 4 3/4"


I stamped some of the dragonflies on the front layer of Misty Moonlight.  I used White Craft ink for a soft, subtle effect.  As you can see I made quite a few of them for our Team swap!  
Next is a pretty card in Soft Succulent & White.  

I used the new Artfully Layered stamp set along with the Stitched Rectangle dies.  This technique is called Triple Time Stamping. 

To achieve this layered effect I stamped all three of the White layers at the same time. Then you adhere each piece to a Soft Succulent layer and put the pieces back together; almost like a puzzle.  It's a great way to create quick, eye catching cards. 

Measurements:

  • Soft Succulent – 5 1/2" X 8 1/2" card base, 4 1/8" X 2 7/8" & 3" X 1 5/8"
  • White – 5 1/4" X 4", 4" X 2 5/8" & 2 3/4" X 1 3/8" 

Thanks so much for stopping in today. Click on the icon below to see what Melissa has created for you. You won't want to miss it! 
All Posts

  • 3 Stamping Tips you need to know!


    I thought I'd share some of my favorite tips with you today.  

    • how to use a ruler – some people find this extremely challenging
    • standard card sizes and layers
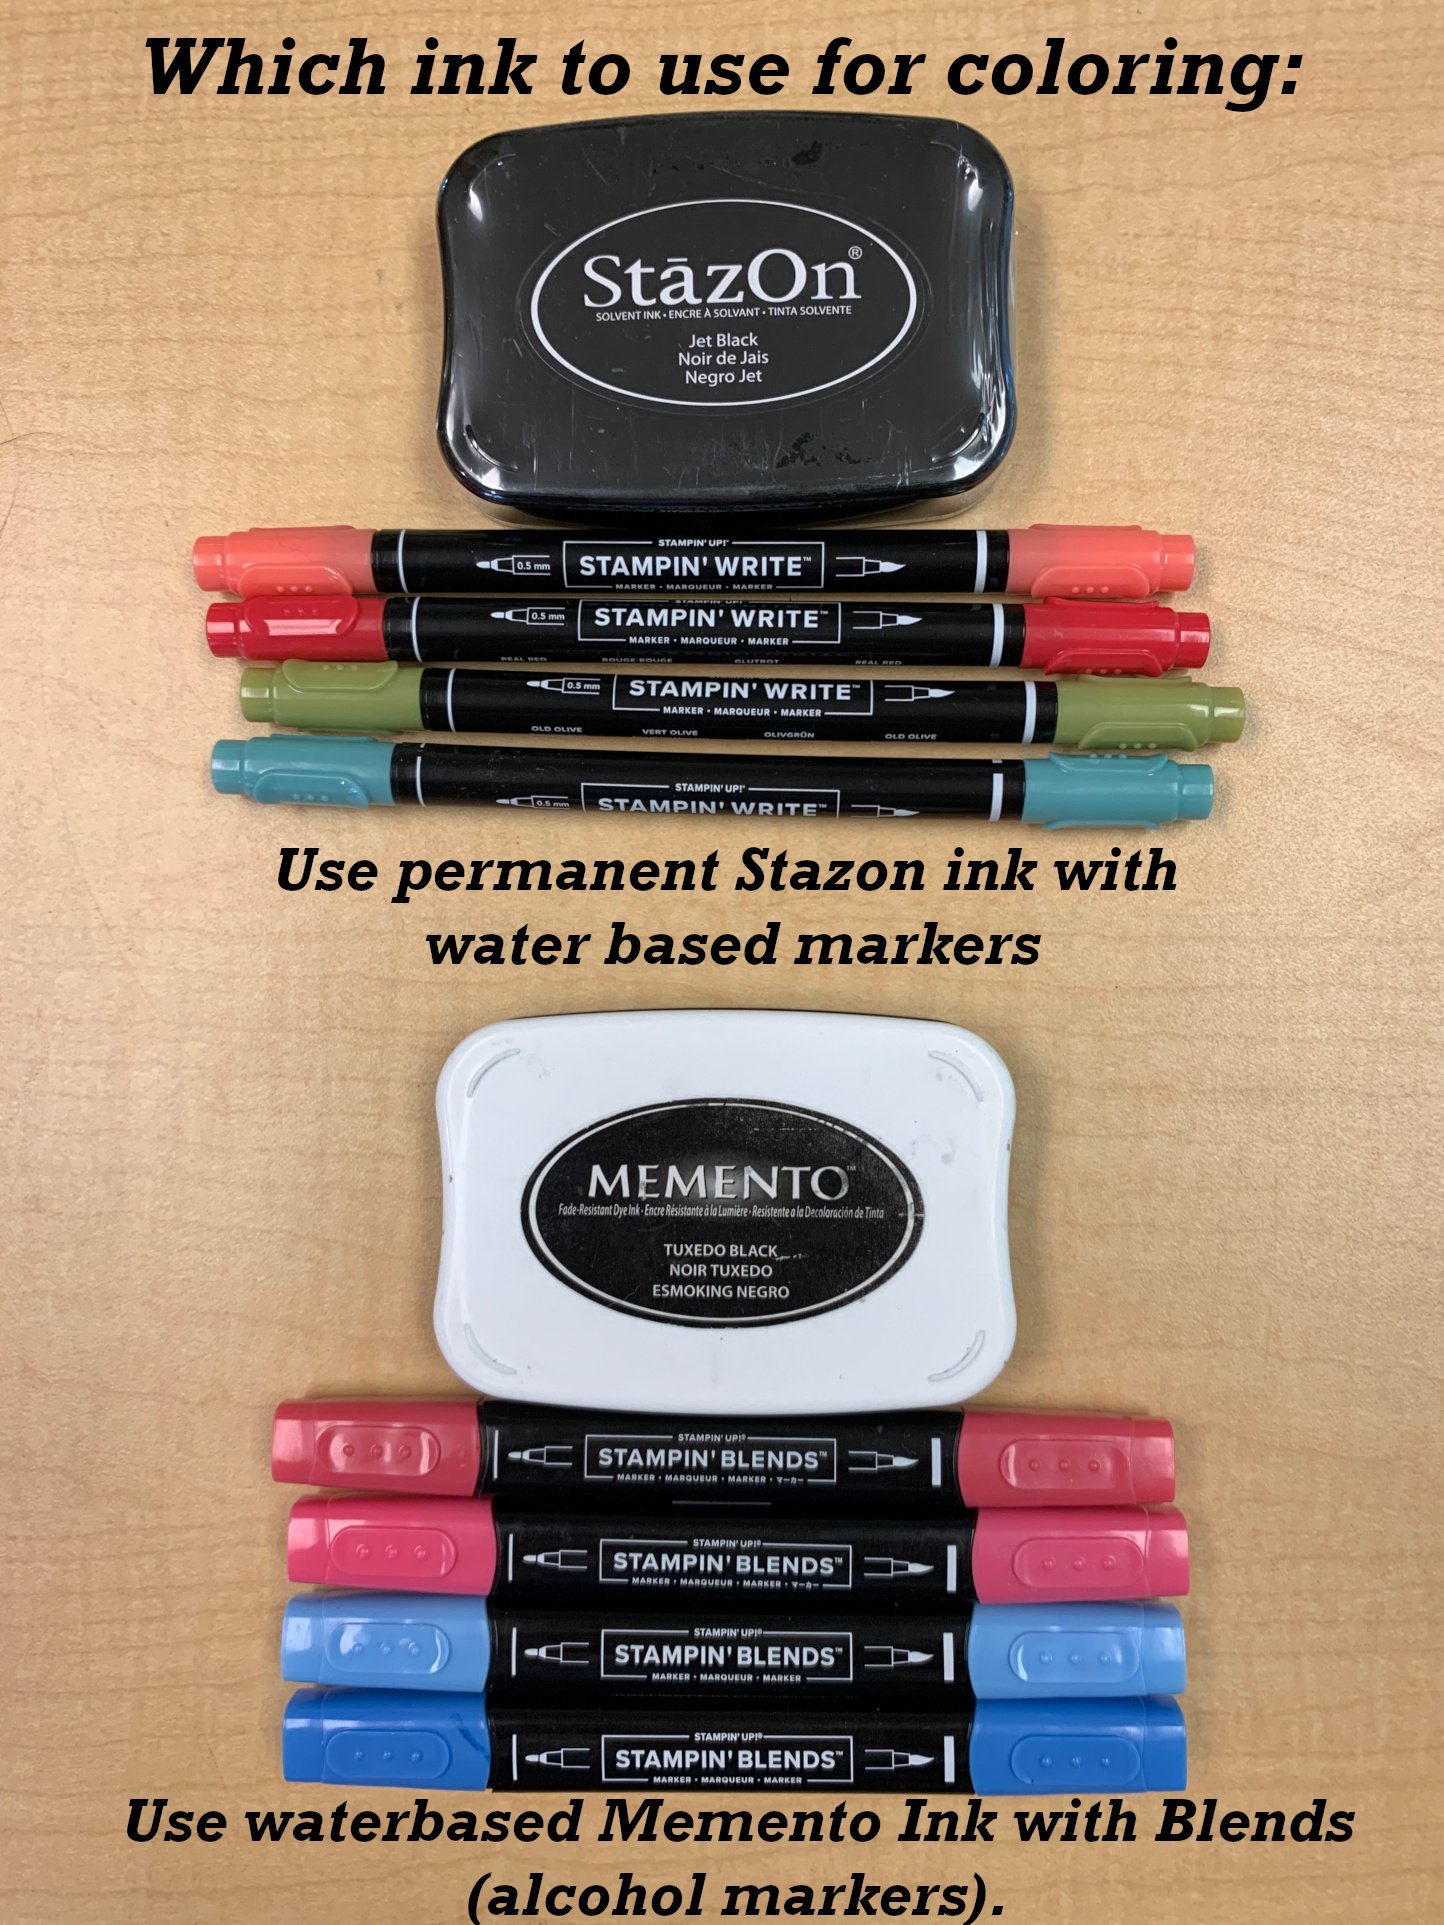
    • which ink to use when coloring with markers

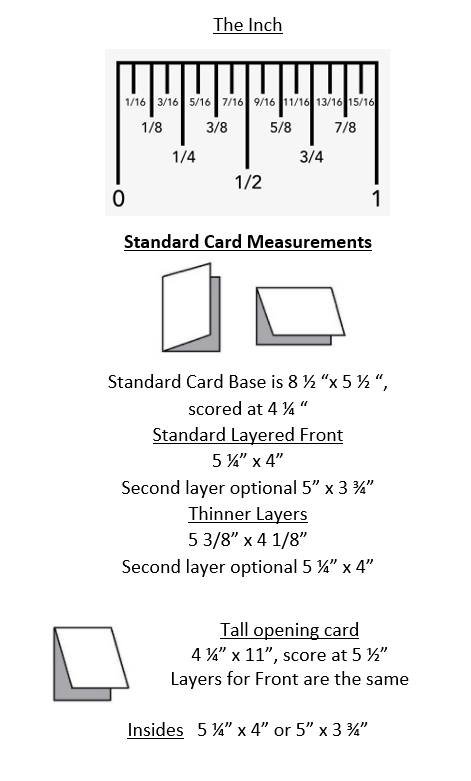
    First up is the ruler and card measurements.  Understanding measurements can make card making so much easier!

    I hope the above graphic helps you when you're creating a card. Save it or print it out. 

    ~~~

    Next I have a helpful photo for coloring your stamped images.  It's very important to use the correct ink to prevent smearing as you color. 

    I do also want to share a few more tips for coloring:

    • Use Stazon ink when coloring with colored pencils, blender pens, water painters or when picking up our Classic ink from your ink pad.

    ~~~

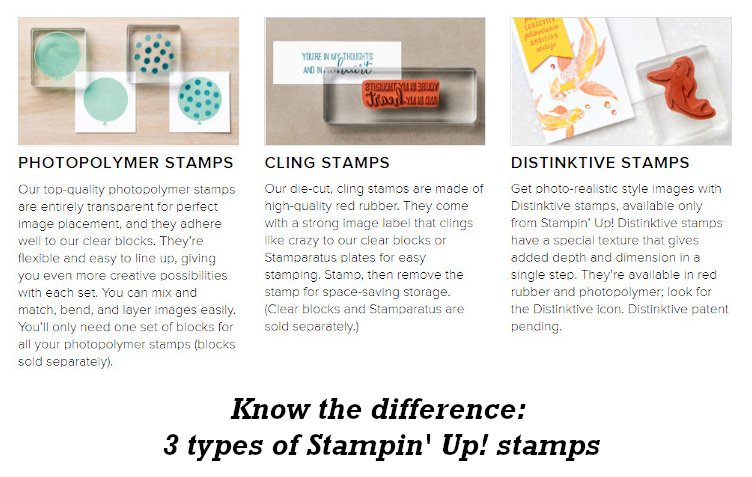
    Lastly is a list of the three types of stamps Stampin' Up! offers.  It might be hard to read so I'll share the details in this list:

    1. Photopolymer stamps are entirely transparent and adhere to your clear block. They're flexible and easy to use; especially with 2-step use.  
    2. Clink stamps are made of high-quality rubber. They cling like crazy to our clear blocks. 
    3. Distinktive stamps are a photo-realistic image with a special texture that give added depth and dimension with a single stamp. 

    *I hope one or more of these tips help you.  Let me know which one or two you learned from today.  

    ~~~

    July Specials:

    New Online Exclusives are here!  

    ~~~

    Last Chance List has been updated!  see it all here. Don't miss out on the deals!

    ~~~

    Get my Turtle-y Cute PDF tutorial free with any online order in July!

    Leave a Reply

    Your email address will not be published. Required fields are marked *

  • Floral Charm fun-fold card kit to go or choose the PDF tutorial option


    This is my second card kit to go I've created for July.  It features the new Floral Charm designer paper released in our newest Online Exclusives.  It's absolutely gorgeous designer paper!  

    My favorite thing about this pack of paper is that the reverse side of the pretty floral patterns have a coordinating solid print. So I created a batch of fancy fold cards to show them off!  

    The directions for these fun fold cards are included in the PDF tutorial plus there's a private video you'll get access to when you purchase either the kit or the PDF tutorial.  

    This kit to go includes the following products:

    • 1/2 pkg Floral Charm DSP (6" X 12")
    • a share of Peacock/Gold ribbon
    • a share of Shimmer dots
    • pre-cut or die-cut pieces for each of 10 cards
    • the PDF tutorial & video link 

    The kit to go is $31 and can be reserved here.  It is shipped out at the end of July. The PDF tutorial is $16 and can be seen here.  The tutorial is emailed to you immediately after purchase. 

    *You will need stamp greetings, inks, a paper trimmer (to cut your new designer paper) and adhesives to finish the cards. 

    See all of my available kits to go and tutorials here.  Opt in for more than one to save on shipping costs! 

    *If you'd like to subscribe to receive a kit automatically each month please use the button below.  My subscribers get a free surprise every few months along with the guarantee of a beautiful kit full of products too! 

    ~~~

    July Specials:

    New Online Exclusives are here!  

    ~~~

    Last Chance List has been updated!  see it all here. Don't miss out on the deals!

    ~~~

    Get my Turtle-y Cute PDF tutorial free with any online order in July!

    Leave a Reply

    Your email address will not be published. Required fields are marked *

  • Kintsugi Inspirations fun fold card kit to go or tutorial. Reserve yours now!


    I'm thrilled with the cards in the Kintsugi Inspiration kit this month!  I am featuring this unique, gold foil accented designer paper for one of my kits to go in July. (I add 2 new kits to my shop each month!)

     The gorgeous designer paper is definitely the star of these stunning cards. Each of the 10 cards are unique fun fold designs and the video will help you assemble each one.

    The directions for the cards are included in the PDF tutorial plus there's a private video you'll get access to when you purchase either the kit or the PDF tutorial.  

    This kit to go includes the following products:

    • 1/2 pkg Kintsugi Inspirations specialty DSP (6" X 12")
    • a share of Misty Moonlight 1/4" ribbon
    • a share of gold Flower Accent gems
    • pre-cut or die-cut pieces for each of 10 cards
    • the PDF tutorial & video link 

    The kit to go is $31 and can be reserved here.  It is shipped out at the end of July. The PDF tutorial is $16 and can be seen here.  The tutorial is emailed to you immediately after purchase. 

    *You will need stamp greetings, a paper trimmer (to cut your new designer paper), adhesives and inks to finish the cards. 

    See all of my available kits to go and tutorials here.  Opt in for more than one to save on shipping costs! 

    *If you'd like to subscribe to receive a kit automatically each month please use the button below.  My subscribers get a free surprise every few months along with the guarantee of a beautiful kit full of products too! 

    ~~~

    July Specials:

    New Online Exclusives are here!  

    ~~~

    Last Chance List has been updated!  see it all here. Don't miss out on the deals!

    ~~~

    Get my Turtle-y Cute PDF tutorial free with any online order in July!

    Leave a Reply

    Your email address will not be published. Required fields are marked *


Notice: LeeAnn Greff, Independent Stampin’ Up! Demonstrator, Manager. The content of this website is my sole responsibility as an independent Stampin’ Up! demonstrator and the use of, and content of, the classes, services, or products offered on this website is not endorsed by Stampin’ Up! Copyright 2025