/


Latest Post

Amazing Artist of the Month projects with the Cutest Cow bundle!


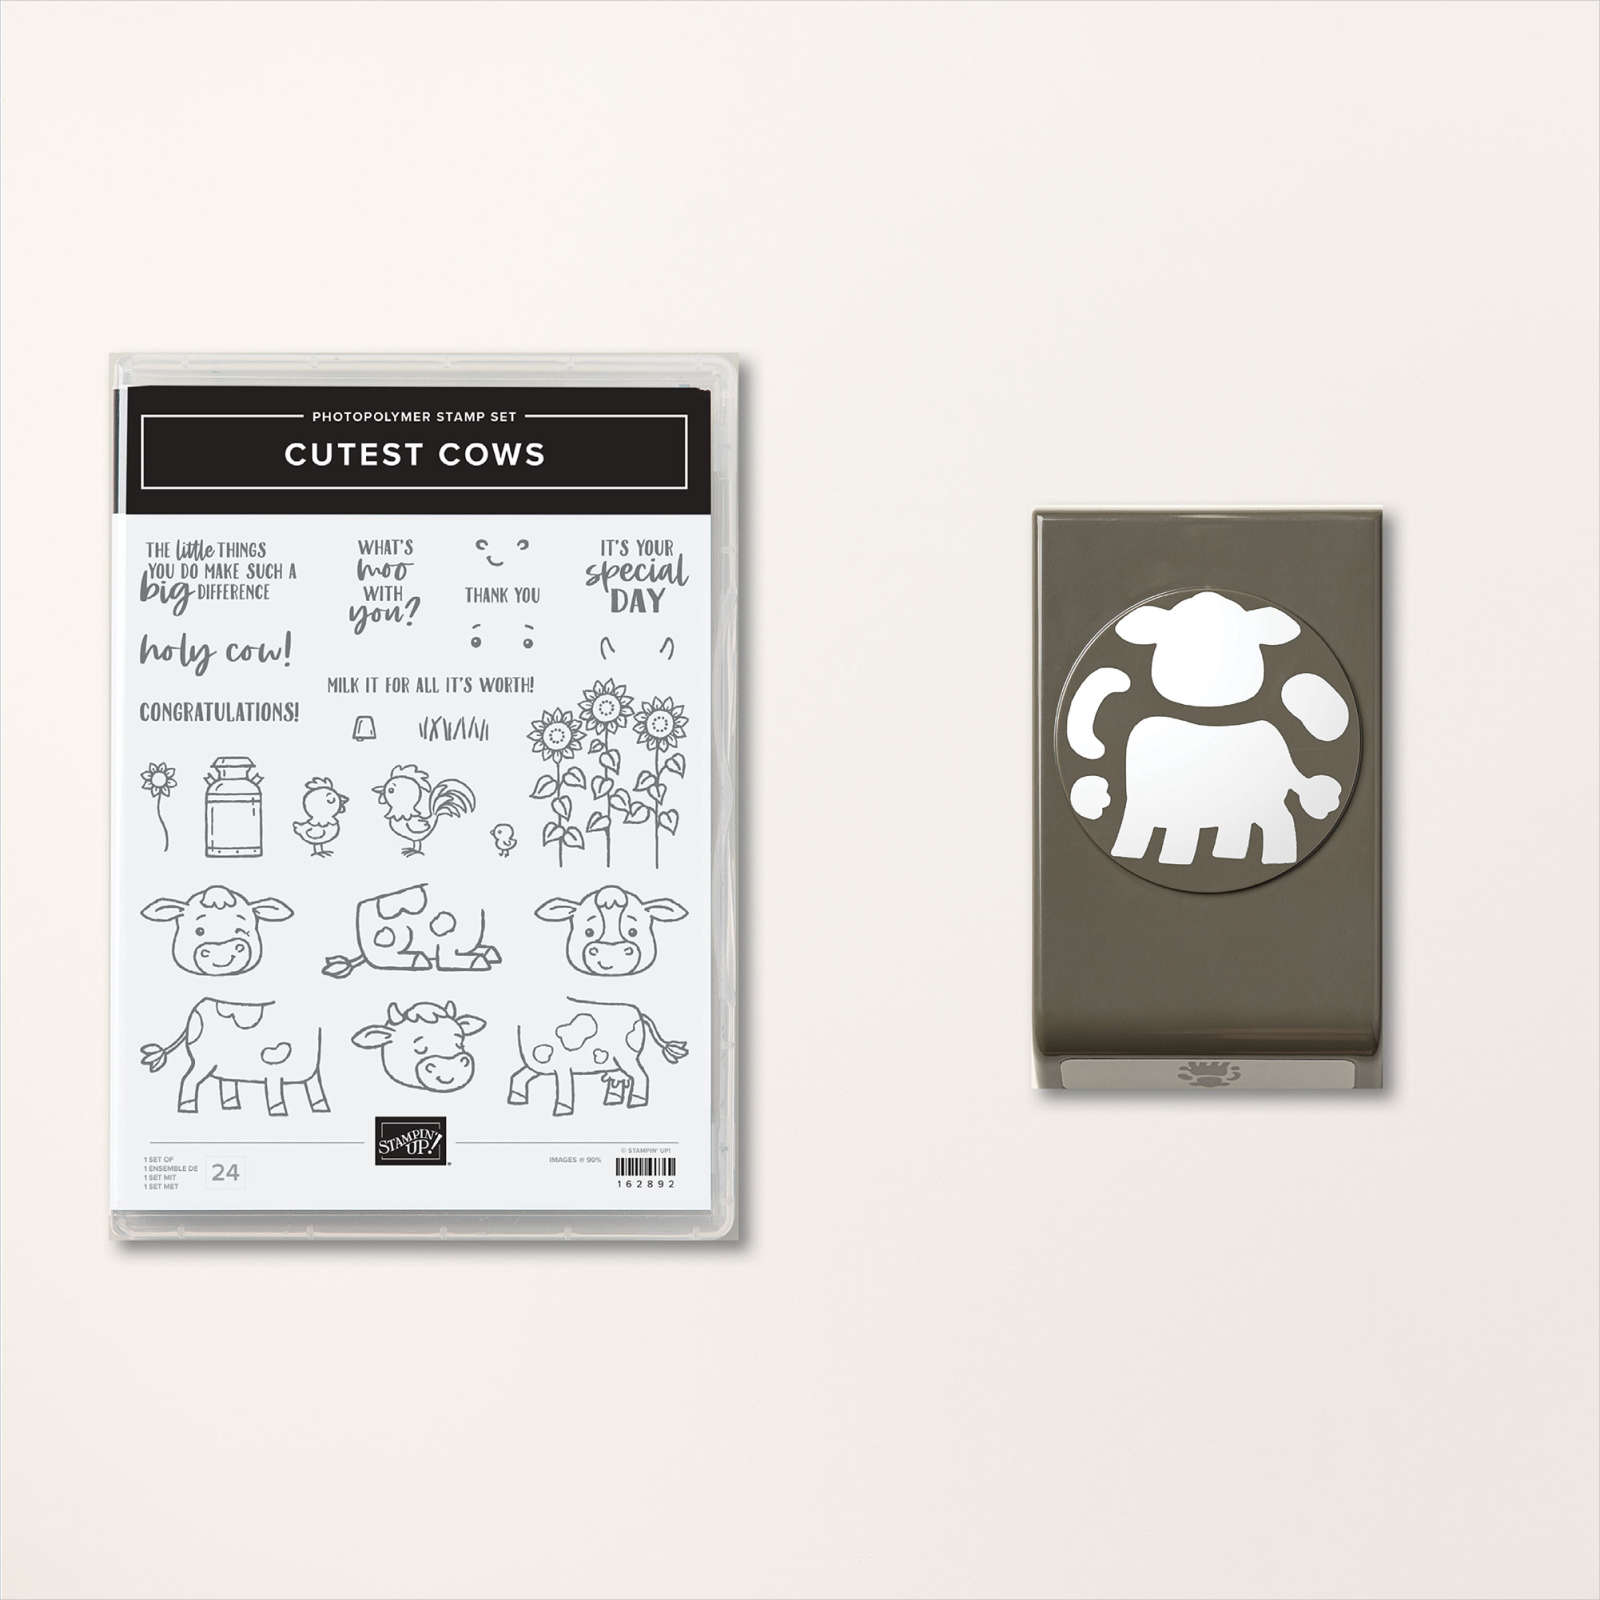
Deloris chose to feature the Cutest Cow bundle for her Artist of the Month projects. She did an incredible job showcasing this cute bundle! 

First is an adorable 'barn' card. Who wouldn't love to receive this fun card? 

Isn't that the best way to feature these cows!?  She cased Queen Bee Creations for this idea. I love the rooster in the window! 

Measurements: 

  • Red card base 4 1/4" X 11" score at 5 1/2". Make a mark 1" inside the fold and 1" above & below the fold line on the edge. Score. 
  • White inside 4" X 5 1/4" – trim off upper corners to fit the fold
  • White strips to form the barn roof are 3/8" and the door are 1/4". 
  • Old Olive grass she cut into a wave shape and used her scissors to create grass

Here's the inside view: 

Next is a sunrise 'Rocker' card using Old Olive & Daffodil Delight. 

The Deckled Circles are a must for these cards! See them here in our Online Store. 

Here are her fun 3d projects: 

For the cow tail candy wrap she used our Blueberry Bushel Glorious Gingham DSP cut with a Deckled circle die. She simply added a few score lines to the middle so it would stand up.

The Udder Stick (chapstick) holder was cased from Cards by TLC and features Berry Burst Glorious Gingham DSP. 

I'll share more of her cute projects tomorrow!

As you can see with her projects, the Cutest Cow bundle is super cute!  The stamp set & punch will be sold in the new Annual Catalog coming out in May. It will not be available in a bundle at 10% off though; the items will be sold separately. 

~~~

March Specials: 

See over 20 brand new Online Exclusive products here!

*current host code links:   ZDUGF6KY or TQWBXR4T

~~~

Get a free package of Rainbow Dots

with online orders over $55 in March

All online orders in March will receive this free Hot Air Balloon tutorial with 8 projects!

All Posts

  • Look what you can do with the Charming Landscapes embossing folders


    I shared a fun way to use the Charming Landscapes embossing folders in this week's FB Live video.  Look! 

    After I textured White card stock with the folders I trimmed the excess off and adhered it over a piece of Lights Aglow designer paper and then onto my White card base.  So simple with just a little bit of fussy cutting.  See the Charming Landscapes embossing duo here. 

    The greeting is from the Brightest Glow stamp set, heat embossed with Gold embossing powder.  A few loops of gold cording is added to the back.  

    Here's another version; a bit more fussy cutting on this one though! 

    This one did take more time to trim….  I added light So Saffron Blends marker and Wink of Stella to the little village houses.

    What do you think?  I love the elegance of the Black, White & Gold colors.  


    Below is the video where I show these cards and a special fun fold card too.  All made with the beautiful Lights Aglow specialty designer paper seen here.  


    There are still a few spots left in my Lights Aglow Christmas card kit to go.  Click here to see it.  Or get the PDF tutorial here.  

    ~~~

    October Specials

    Starter Kit special! Get $155 in product for just $99

    click here

    ~~~

    Order online here

    Host code links: GDCBRHF7 or SVBHWRCY

    Get a free embellishment from me with online orders over $50!


    Earn free products with my loyalty rewards! 

    Click here to download yours and earn a $50 shopping spree!

    Leave a Reply

    Your email address will not be published. Required fields are marked *

  • Cute ideas for Santa Express bonus cards; included in the Kit to Go


    Before we get to today's cards; I have to make sure you know about the Clearance Rack refresh. So many great deals; but they're while supplies last.  Click here to see them. 


    ~~~

    This month one of my kits to go features the Santa Express Memories & More cards seen here.  I sincerely enjoy playing with these cards & the many extra elements included in them.  

    Besides the 10 cards & envelopes they'll make with the kit and PDF tutorial I've created some bonus cards they can make as well.  Here's a peek at them: 

    There's no stamping on any of these; all greetings and layered pieces are from the kit itself.  

    Notice the cursive words and the stars?  These are wooden elements included in the kit!  I colored them with Blends markers.  They're actually nice and thin; maybe around 1/16" in height.  

    Here's a link to this kit to go. It's while supplies last; so opt in soon! 

    ~~~

    October Specials

    Starter Kit special! Get $155 in product for just $99

    click here

    ~~~

    Order online here

    Host code links: GDCBRHF7 or SVBHWRCY

    Get a free embellishment from me with online orders over $50!


    Earn free products with my loyalty rewards! 

    Click here to download yours and earn a $50 shopping spree!

    Leave a Reply

    Your email address will not be published. Required fields are marked *

  • Scary Cute ‘side step’ fun fold card by Sharon!


    Sharon shared this card with us at our last Team Meeting.  It's adorable!!

    Her colors are Rich Razzleberry, Black & Granny Apple Green.  

    She said she cased it from Tammy White.  The card base is all one piece.  It's called a side-step card and here is a link to a tutorial I wrote years ago.  She used the Scary Silhouette dies for the left side and the Bewitching stamp set for the hat & boots on the right.  

    The hat & boots are popped up on the steps with thin strips of window sheets.  There is white glimmer paper behind the die-cuts on the front.  I love the say she achieved the silhouette under the Black layer.  She did this by snipping the green die-cut in half on the sides and moving it down from the top and up from the bottom.  

    You can see this Scary Cute bundle here.  And it's in stock! 

    ~~~

    October Specials

    Starter Kit special! Get $155 in product for just $99

    click here

    ~~~

    Order online here

    Host code links: GDCBRHF7 or SVBHWRCY

    Get a free embellishment from me with online orders over $50!


    Earn free products with my loyalty rewards! 

    Click here to download yours and earn a $50 shopping spree!

    Leave a Reply

    Your email address will not be published. Required fields are marked *


Notice: LeeAnn Greff, Independent Stampin’ Up! Demonstrator, Manager. The content of this website is my sole responsibility as an independent Stampin’ Up! demonstrator and the use of, and content of, the classes, services, or products offered on this website is not endorsed by Stampin’ Up! Copyright 2025