/


Latest Post

All About Autumn fun fold cards; choose the kits to go or PDF tutorial option


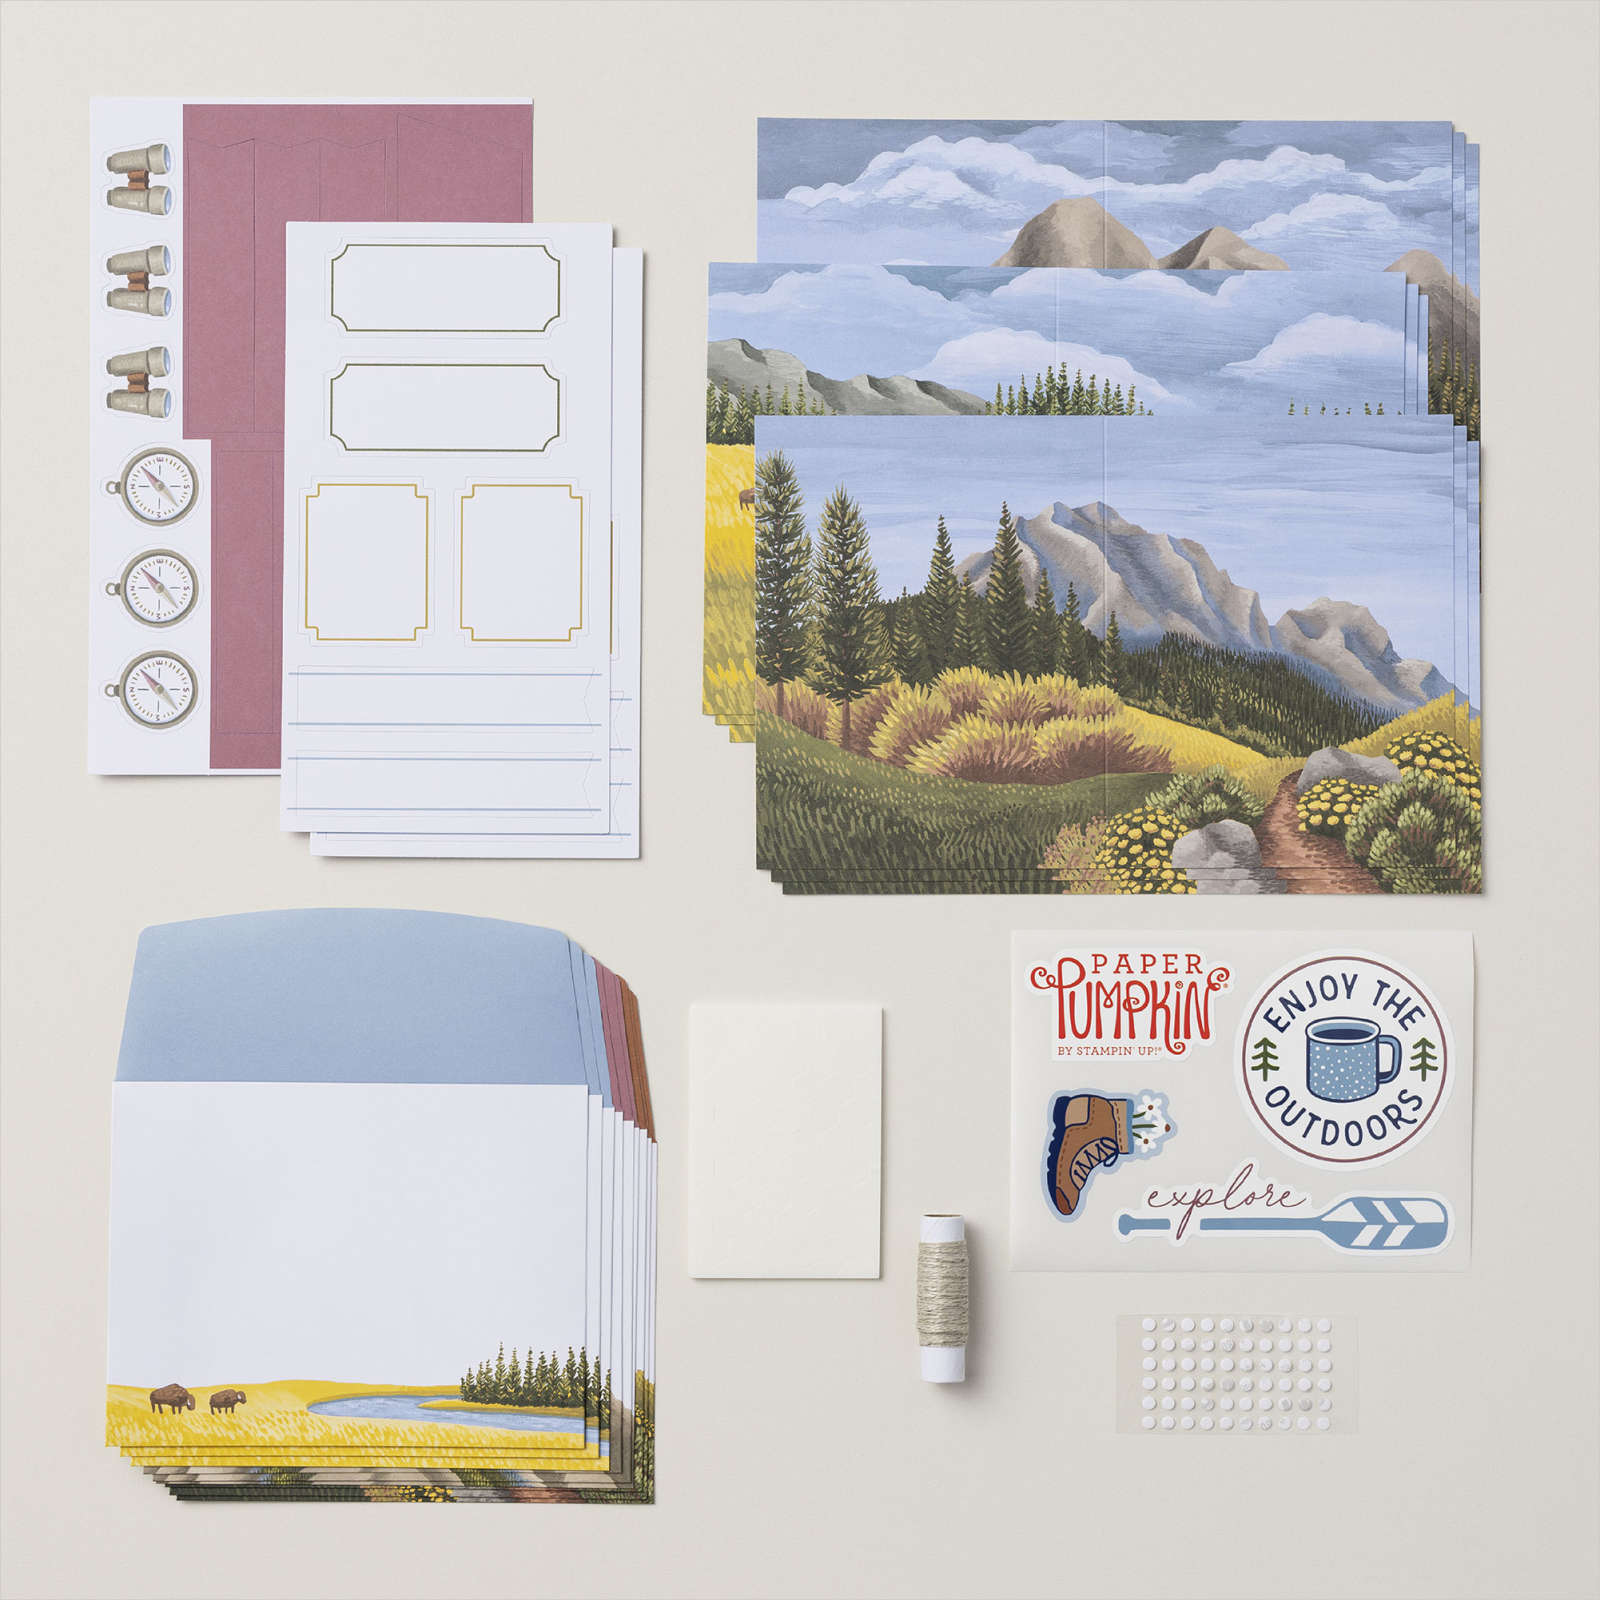
Especially for those who love fall – this gorgeous All About Autumn designer paper is showcased beautifully in these fun fold cards.  

There are 2 of each of 5 designs; each a unique fun fold card. This is one of two kit choices in September.

This kit includes 1/2 pkg. of 6 X 6" All About Autumn designer paper, a share of Copper ribbon and the new Adhesive-backed sparkle gems. *Due to the Copper Ribbon combo being unavailable until the end of October, I will substitute Copper ribbon from the annual catalog instead.

It also includes the PDF tutorial – which is emailed to you immediately after payment.  Check your spam or junk mail.  

The pre-cut kit includes all pre-cut pieces including punched & die-cuts; you'll cut your new designer paper using the measurements in the PDF tutorial. 

Reserve your pre-cut kit to go here by September 18th. The kit is mailed to you via Priority Mail at the end of September. 

Reserve the pre-cut card kit here for $28 plus shipping:

Or choose the PDF tutorial here for $15: 

The PDF tutorial includes photos, measurements, supplies list and step by step directions for each card. 

I used the So Sincere stamp set for my greetings.  Add it on at a 10% discount!  Message me here for this option. You can substitute other greetings easily.

*Save $$ on shipping and add a second kit to your package! See all of the choices here.

*This All About Autumn specialty designer paper is currently unavailable but should return by next week.  

~~~

September Specials: 

 *current host code: Z9BRPPWA or MYF6MXAG

Reserve your Holiday catalog designer paper share:

$37 with shipping to you; message me here

(There may be a delay due to a few papers being unavailable for a bit)

*Get a free 6 card kit with orders over $55 (Includes card bases, coordinating envelopes, Memories & More cards, gems & more) 

~~~

NEW Designer papers released September 6th!  While supplies last!

All Posts

  • Decorative Borders Book Binding card with video tutorial


    I shared this special card on a recent FB Live.  It features a few techniques and is a fun fold card too.  

    It's made with the Decorative Borders stamp set seen here; a new favorite! 

    When I saw this pretty leaves image I thought of creating a frame with it.  I show how on the video below.

    This book binding fold is so easy; it's just one extra fold line! 

    Measurements:

    • Black card base 4 ¼” X 11” score at 4 ¼” & 5 ½”
    • White 3 7/8” square, inside is 4" square
    • Polished Pink 4”
    • Parakeet Party 1” X 4

    I used my Stamparatus to create the pretty border on the Parakeet Party strip and a Baby Wipe technique for the colorful flowers. The leaves are colored with Blends markers; note the pretty shading!  Parakeet Party & Granny Apple Green blends.

    The greeting is from the Framed Florets set seen here.

    There are so many ways you might use this set; I share a few more in the video below.  It would be perfect to decorate your envelopes too! 

    Here's how I finished the inside of the card. 

    Click here or on the photo below to watch the video. 

    ~~~

    March Specials:

    See the new Online Exclusives here! 

    *current host code:  TMJXFR2T or BFE4C2KM

    Get a free class kit with online orders over $55 when using the host code above!

    Earn free products with my loyalty rewards! 

    Click here to download yours and earn a $50 shopping spree!

    Leave a Reply

    Your email address will not be published. Required fields are marked *

  • Decorative Borders & coloring vellum technique with video


    Last month our Flowerbug's Team swap theme was to use vellum or window sheets.  Here's what I came up with featuring the Decorative Borders stamp set seen here.  

    I heat embossed the image twice with black embossing folder in two corners.  This is on vellum card stock. After it was set I colored in the images with Blends markers – Polished Pink, Granny Apple Green and Old Olive.  The corner image is small but it still took a bit of time to do them all.  I colored on the back side; no real reason except it's a little more forgiving. 

    The greeting die-cut is from the Potted Succulents dies; the heat embossed image is from Color & Contour stamp set in the Annual Catalog. 

    My measurements are:

    • Card base 5 1/2" X 6 1/2" scored at 4 1/4"
    • Printed vellum 1 7/8" X 5 1/4"
    • Vellum card stock 3 1/4" X 4 1/8"
    • White front 3 1/2" X 4 1/2" , inside 3 1/2" X 4 3/4" 
    • Black 3 3/4" X 4 3/4" 

    Below is a photo of the pretty Decorative Borders stamp set.  There are so many ways you might use this set; I share a few more in the video below.  It would be perfect to decorate your envelopes too! 

    Here's how I finished the inside of the card. 

    Click here or on the photo below to watch the video. 

    ~~~

    March Specials:

    See the new Online Exclusives here! 

    *current host code:  TMJXFR2T or BFE4C2KM

    Get a free class kit with online orders over $55 when using the host code above!

    Earn free products with my loyalty rewards! 

    Click here to download yours and earn a $50 shopping spree!

    Leave a Reply

    Your email address will not be published. Required fields are marked *

  • Love Cats video tutorial with an easy but unique fun fold


    We made this CUTE card at my February card clubs.  It really shows off the Love Cats stamp set seen here. 


    I shared it on my FB Live yesterday (see video below). It's sort of a unique fold in that the card base is a quarter sheet and the Sweet Sorbet is smaller and opens; see?  

    In order to get full, solid images I used the Stamparatus for the cats.  It makes a world of difference!  *Catch the tips in the video below.


    *Other items used here are the Conversation Bubbles dies, Pastel Adhesive-backed sequins, Balmy Blue variegated ribbon, Stylish Shapes dies, White embossing powder, Heat Tool, Sweet Sorbet Blends marker

    Measurements:

    • Card base 8 ½” X 5 ½”
    • Sweet Sorbet 8” X 5 ¼” scored at 4”
    • White inside is 3 ½” X 4 ¾”
    • DSP 1 ½” X 5 ¼”

    I used the Happy Labels stamp set for the inside greetings.  It has some fabulous images; see it here.  

    Click here or on the photo below to watch the video. 

    ~~~

    March Specials:

    See the new Online Exclusives here! 

    *current host code:  TMJXFR2T or BFE4C2KM

    Get a free class kit with online orders over $55 when using the host code above!

    Earn free products with my loyalty rewards! 

    Click here to download yours and earn a $50 shopping spree!

    Leave a Reply

    Your email address will not be published. Required fields are marked *


Notice: LeeAnn Greff, Independent Stampin’ Up! Demonstrator, Manager. The content of this website is my sole responsibility as an independent Stampin’ Up! demonstrator and the use of, and content of, the classes, services, or products offered on this website is not endorsed by Stampin’ Up! Copyright 2025