/


Latest Post

A beautiful card with Thankful Garden bundle & masks – with lots of tips in the video!


Today I'm sharing the cards we made at my March card clubs.  I also shared it in last week's video. 

I featured the Thankful Garden bundle from our Online Exclusives.  This bundle includes a stamp set, coordinating dies and the set of 5 masks.  Click here to see it online.  

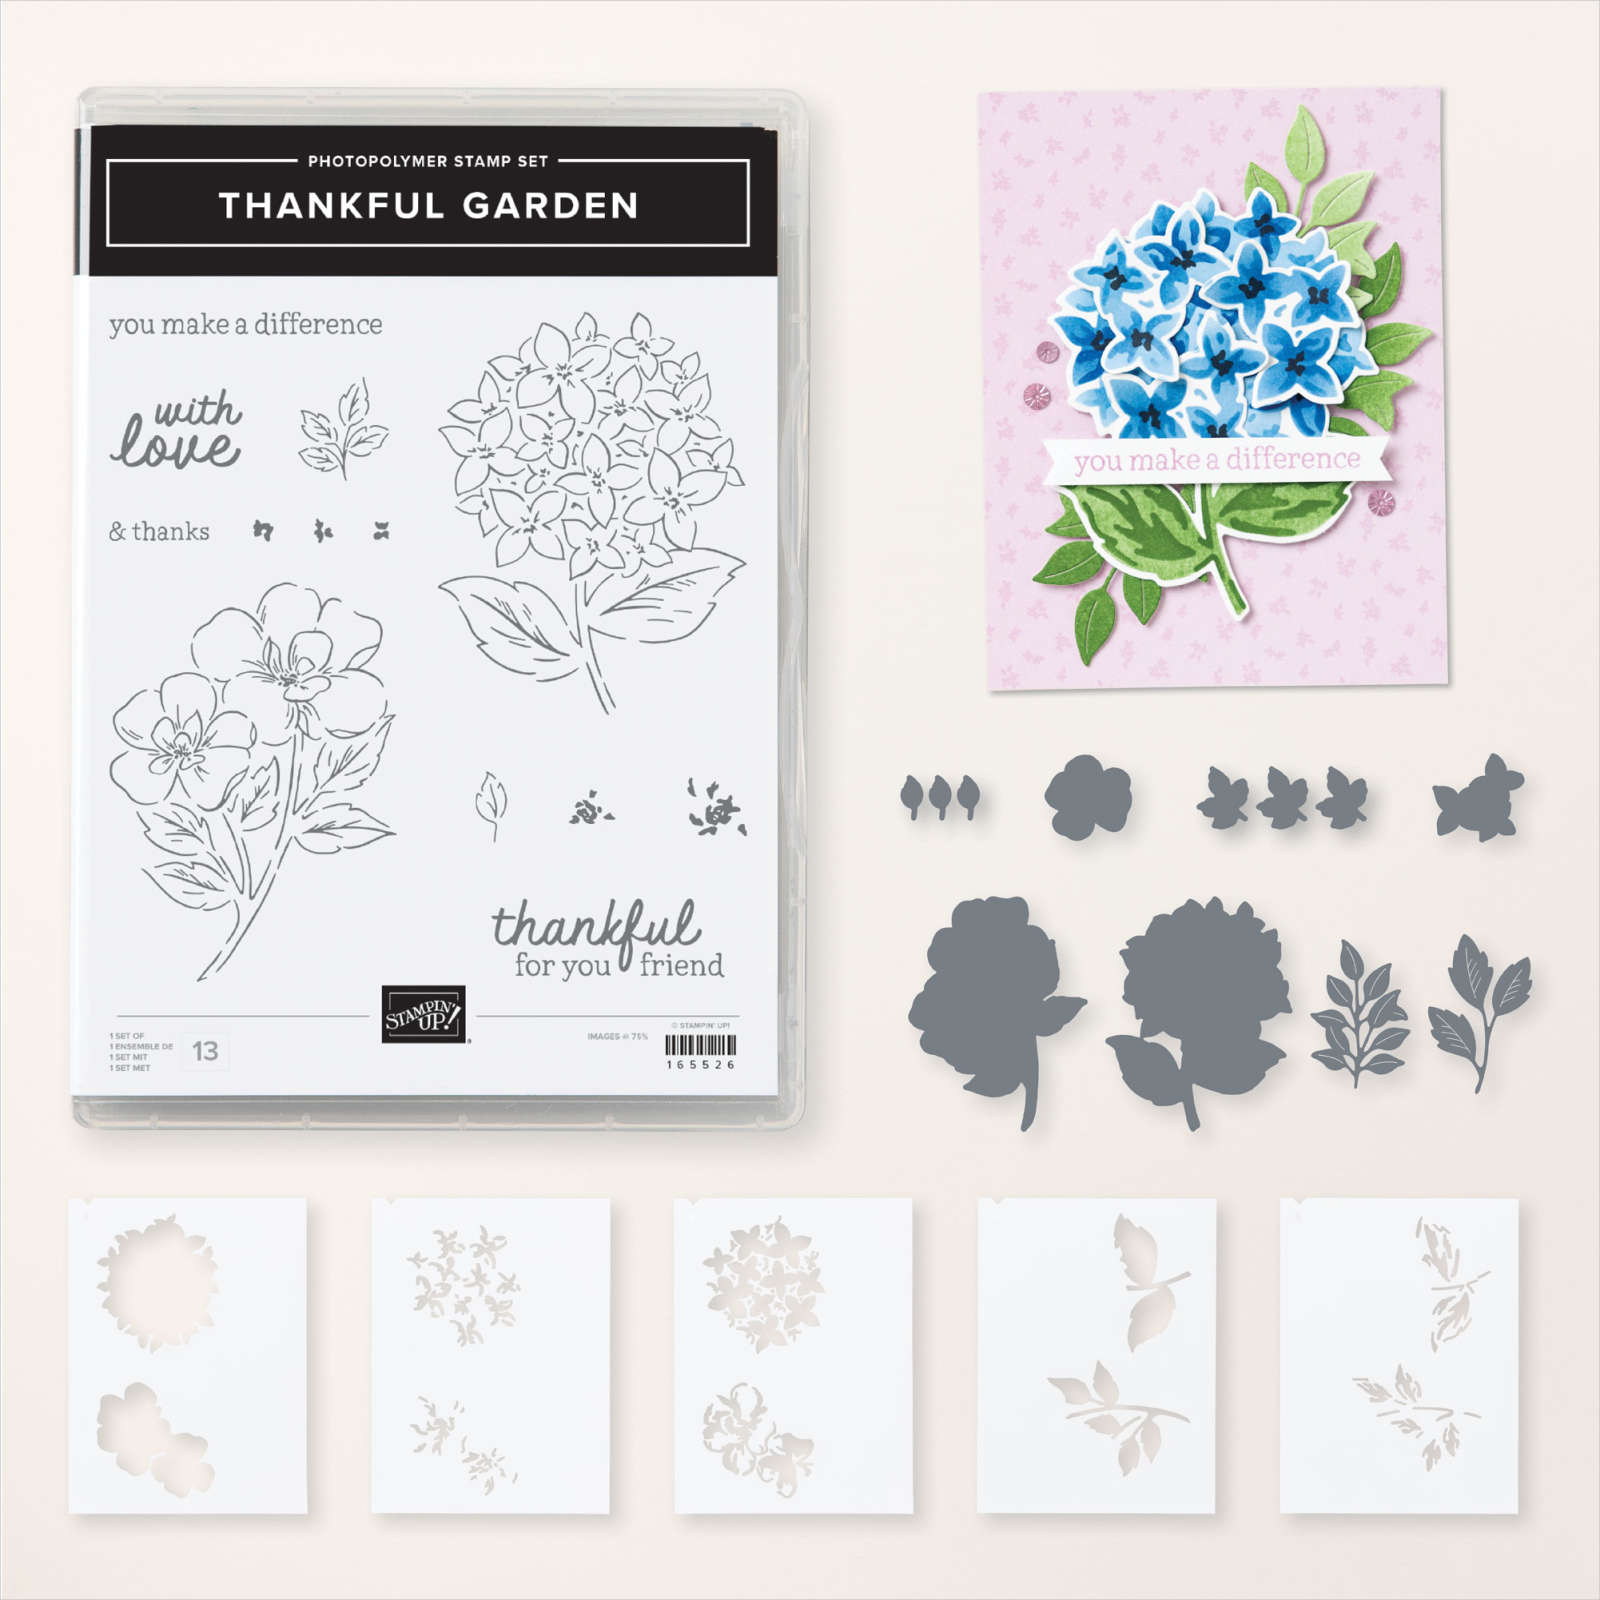
I shared quite a few helpful tips on using these masks in the video here.  Using them with our Blending Brushes truly makes you feel like an artist!  You get the multi-colored & layered effect so easily. 

The greetings here are from the Unbounded Love stamp set.  My colors include Fresh Freesia, Black, Lemon Lime Twist and Balmy Blue.  

Can you notice the 4 differences between the cards below?  Which one is your favorite? 

Below is the video tutorial for this card and another neat fun fold layout. 

~~~

April Specials

Don't miss the deals in the Last Chance list here!


*host codes have been discontinued; no need to add one.  Now you'll earn host rewards on all orders over $20!

~~~  

Get a free Botanical Textures PDF tutorial with any online order in April!

See this gorgeous suite here

Get a free gift from me with any order over $55

All Posts

  • Easy Christmas Ornament card


    I think this is pretty clever & unique; it's a 'faux' Christmas ornament on a card. And it's quick & easy too!  

    It looks so real; like you could lift it off!  And you actually could if you use temporary adhesive; or add it to a pocket.  

    I shared this project on a FB Live last week.  It's the second project I made in this video.  

    Products used:

    • Merry Melody embossing folder on the White CS
    • The ornament is made with the largest smooth circle in our Circles dies. 
    • The DSP is called Painted Christmas and is in low inventory right now.  
    • Elegant Trim for the 'hanger'. 
    • Brushed Metallic specialty CS for the 'hanger'. 
    • Heat embossing for the greeting – from the Words of Cheer stamp set. 
    • CS is Real Red, White & Evening Evergreen 

    Here's a close-up of it. 

    I give a few hints in the video on achieving this.  Basically you want to stamp your greeting first and add it to your DSP.  THEN cut both pieces out at the same time with your circle die. 

    Below is the video for you. I share another special card project and some pretty star/snowflake ornaments as well.  

    ~~~

    December Specials:

    Host code:  6YCWV7QN

     *click here to order 

    Use the host code above & get a free card stock sampler ring with a $50 order in December! 

    See the last chance list here

    See the July-December catalog carry over list here

    Leave a Reply

    Your email address will not be published. Required fields are marked *

  • Fun way to use paper strips! Live video tonight!


    We made these cards on FB Live Monday night.  What a fun and easy way to use up your extra designer paper pieces! Click here to watch the video. 

    I used the Pattern Party designer paper for these cards. It's a host choice in the back of the annual catalog seen here.  One side is Black & White and the other is colorful prints. I love the black & white patterns with a pop of color! 

    Tips: 

    • I start out with a 2 1/4" X 4 3/4" piece of neutral CS.  This is what I adhered the strips of Designer Paper to. 
    • I added Seal adhesive over the entire piece and added the strips one by one. 
    • Apply one strip across the middle at an angle first. Then keep filling in. 
    • I trimmed the excess off the edges once I had it well covered with strips.  
    • My DSP strips measure between 1/4" and 5/8" wide and about 3" long.  It doesn't matter how wide your strips are; it looks great if they're different widths.  
    • Add dimensionals to the back of this piece for added dimension. 
    • Add a greeting and accents if desired. 

    You might wonder where this greeting is from.  It's an upcoming Sale-a-Bration stamp set called 'Hello Friend'.  It's in a bundle with a pack of Designer Paper.  It will be free with a $100 purchase during SAB in January & February.  Of course Demo's can earn it free now during our pre-order period. 

    The other new items here is a punch.  Can you spot it?  It's called the bough punch and has two options in the punch.  The large leaf and the 'buds' too.  

    Below is the video for you: 

    ~~~

    December Specials:

    Host code:  6YCWV7QN

     *click here to order 

    Use the host code above & get a free card stock sampler ring with a $50 order in December! 

    See the last chance list here

    See the July-December catalog carry over list here

    Leave a Reply

    Your email address will not be published. Required fields are marked *

  • Last of the unique ‘Gift Card’ ideas with video!


    I've shared two other special gift card ideas and today I have another.  It's the last one I shared in this video. 

    It features the Penguin Place bundle seen here.   And it's now available but on low inventory; once more.  The punch was out of stock for a long time. 

    This penguin is super cute and quite versatile.  Certainly not just for Christmas!

    Details:

    • His main body is punched out of Black glitter paper. 
    • I fussy cut his scarf from Heartwarming Hugs DSP. 
    • I stamped the snowflakes on the Black CS using our White Craft ink.  

    This card opens up like this: 

    There's a fold inside that brings up the 'gift card' when you lift up the card front.  I did use Thick White CS for this so it stands up to lots of use. Isn't it fun?  It's quite easy too!

    Measurements for the Pull-Up Penguin Gift Card

    • Card base 4 ¼” X 5 ½”, DSP 2” X 3 ¾”
    • Black card 4” X 11” scored at 3 ½” & 8 ¾”
    • Inside Thick White 2 ½” X 5 ½” or 6” scored at 3/4" from each end
    • Front white 2” X 3”, Black 2 ¼” X 3 ¼”, Red 2 ½” X 3 ½”

    Below is the video tutorial.  It's the third & last project I share.  

    ~~~

    December Specials:

    Host code:  6YCWV7QN

     *click here to order 

    Use the host code above & get a free card stock sampler ring with a $50 order in December! 

    See the last chance list here

    See the July-December catalog carry over list here

    Leave a Reply

    Your email address will not be published. Required fields are marked *


Notice: LeeAnn Greff, Independent Stampin’ Up! Demonstrator, Manager. The content of this website is my sole responsibility as an independent Stampin’ Up! demonstrator and the use of, and content of, the classes, services, or products offered on this website is not endorsed by Stampin’ Up! Copyright 2025