/


Latest Post

2 fabulous new Kits in our Kit Collection


At the beginning of each month Stampin’ Up! adds at least 2 new kits in their online Kit Collection. This month they’re extra special!

First is a 9 card kit called Painted Skies and it’s a big WOW.

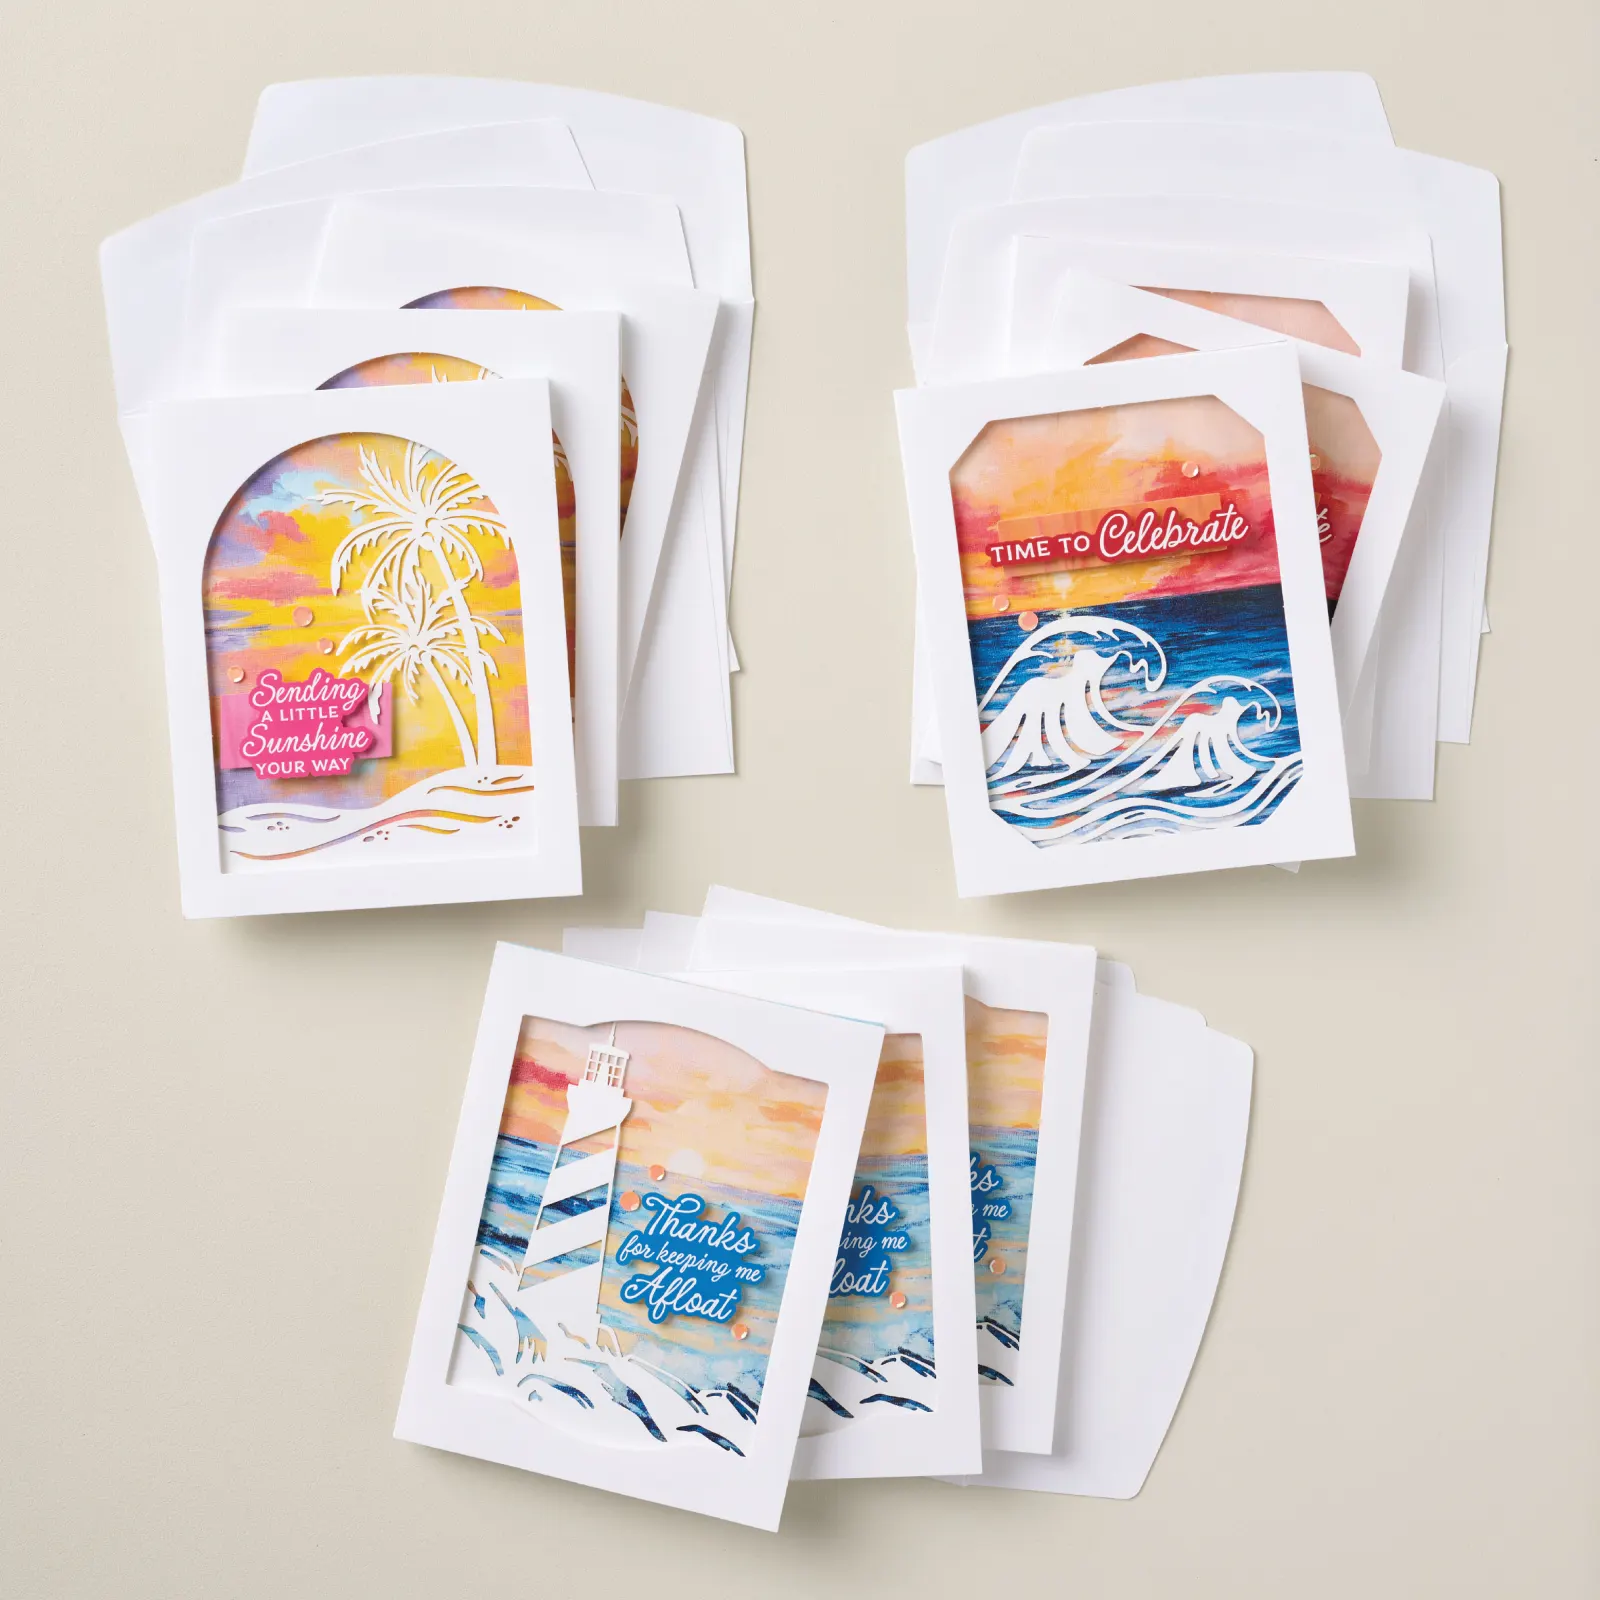
See what I mean? This is an all inclusive kit that has no stamping required. You’ll be especially proud to give these cards away.

Each one is a fun fold card that opens once and then once more. It comes with everything you need to complete them. Pre-stamped greetings, die-cut beachy elements, Dimensionals, gems and adhesive. It’s $18 and you can see it here.

The second new kit is a big Scrapbooking kit called Sunniest Stories and can be seen here.

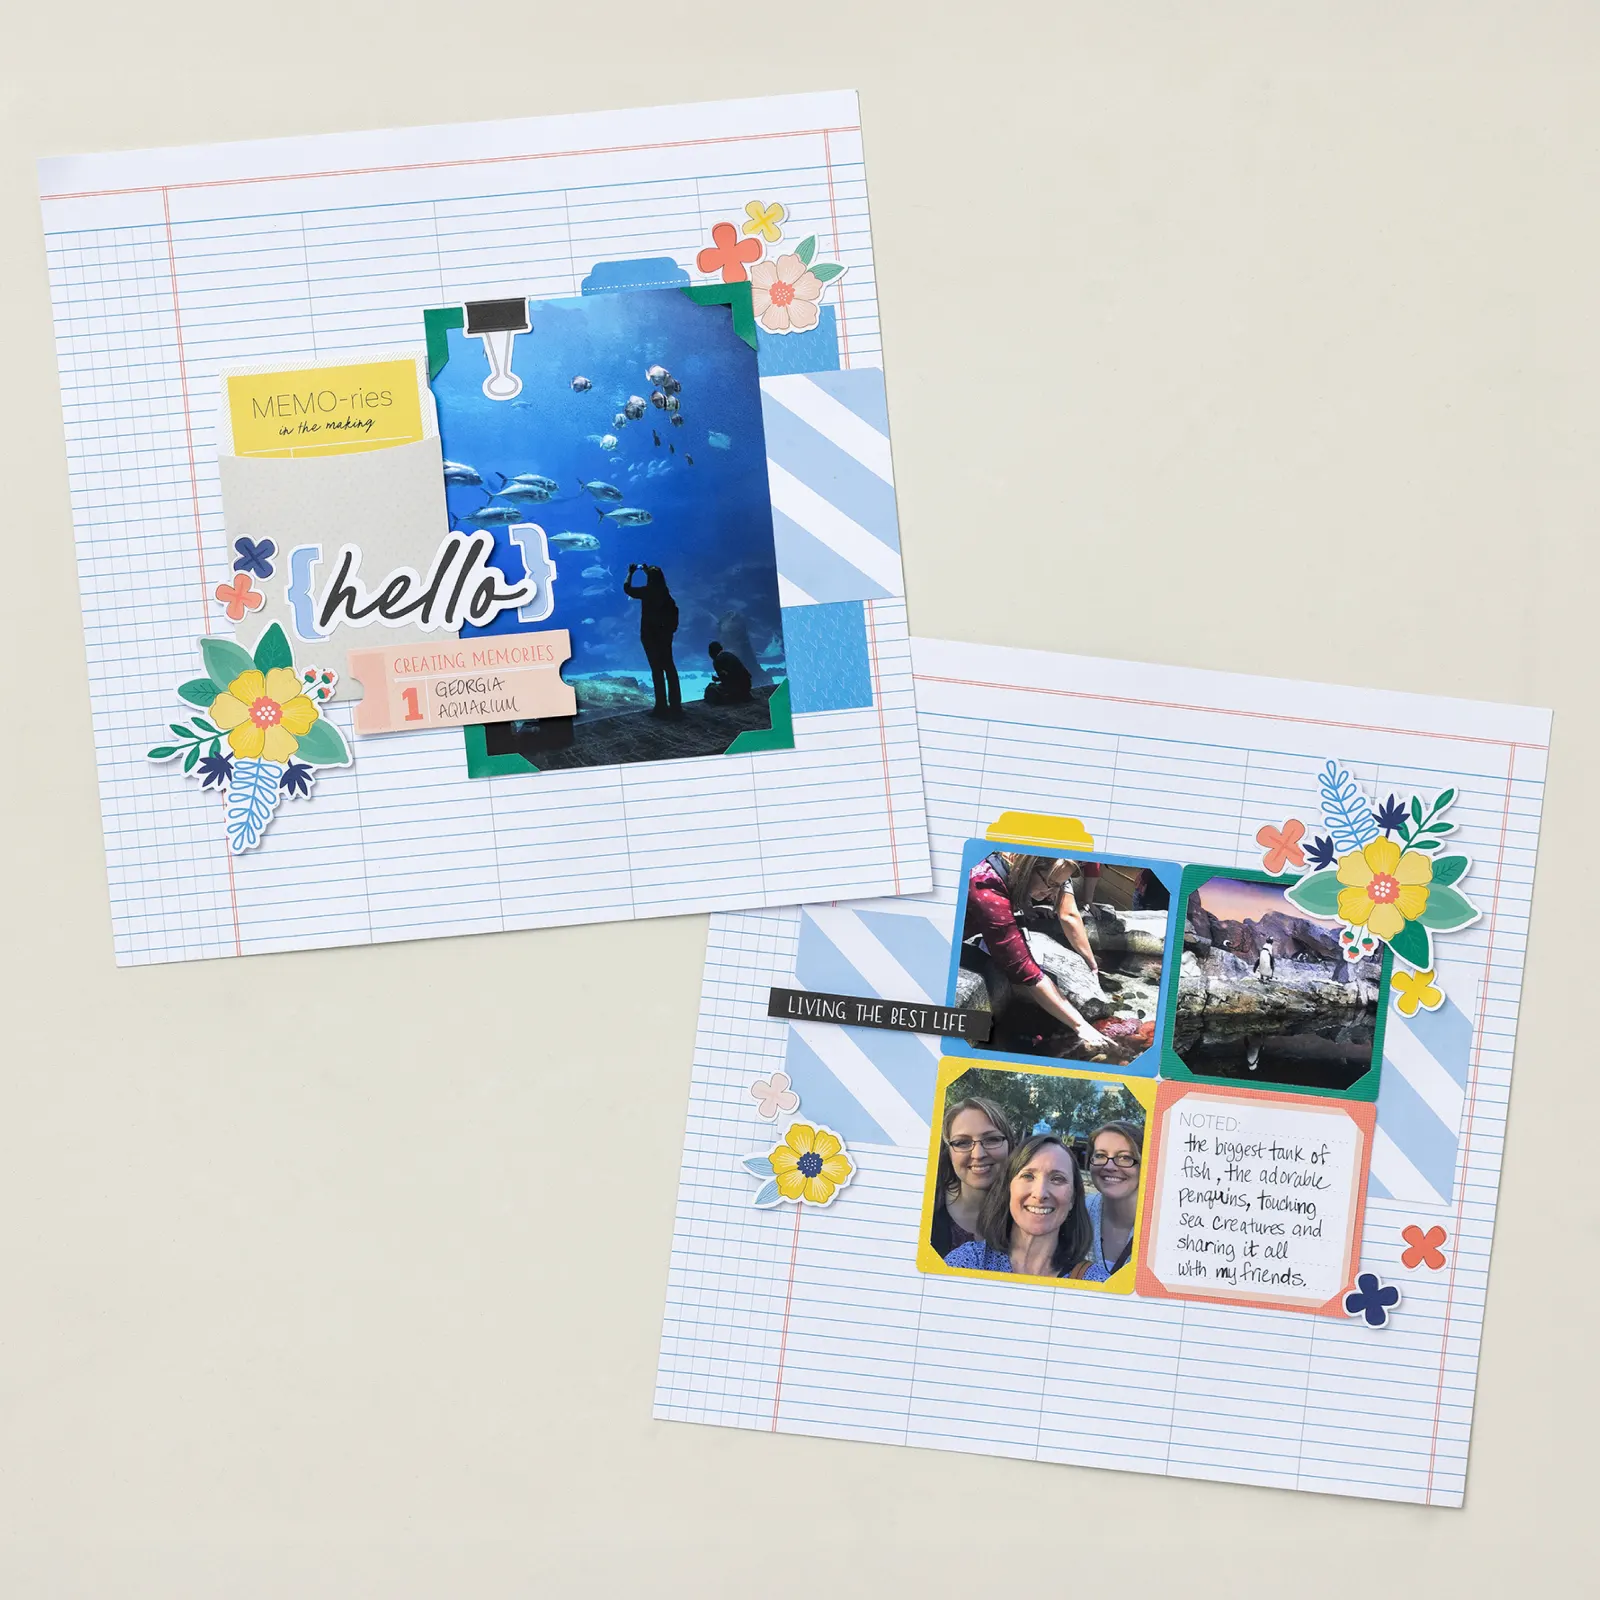
It can create at least 12 pages like the two above! That’s 6 double layouts in 12 X 12″ size.
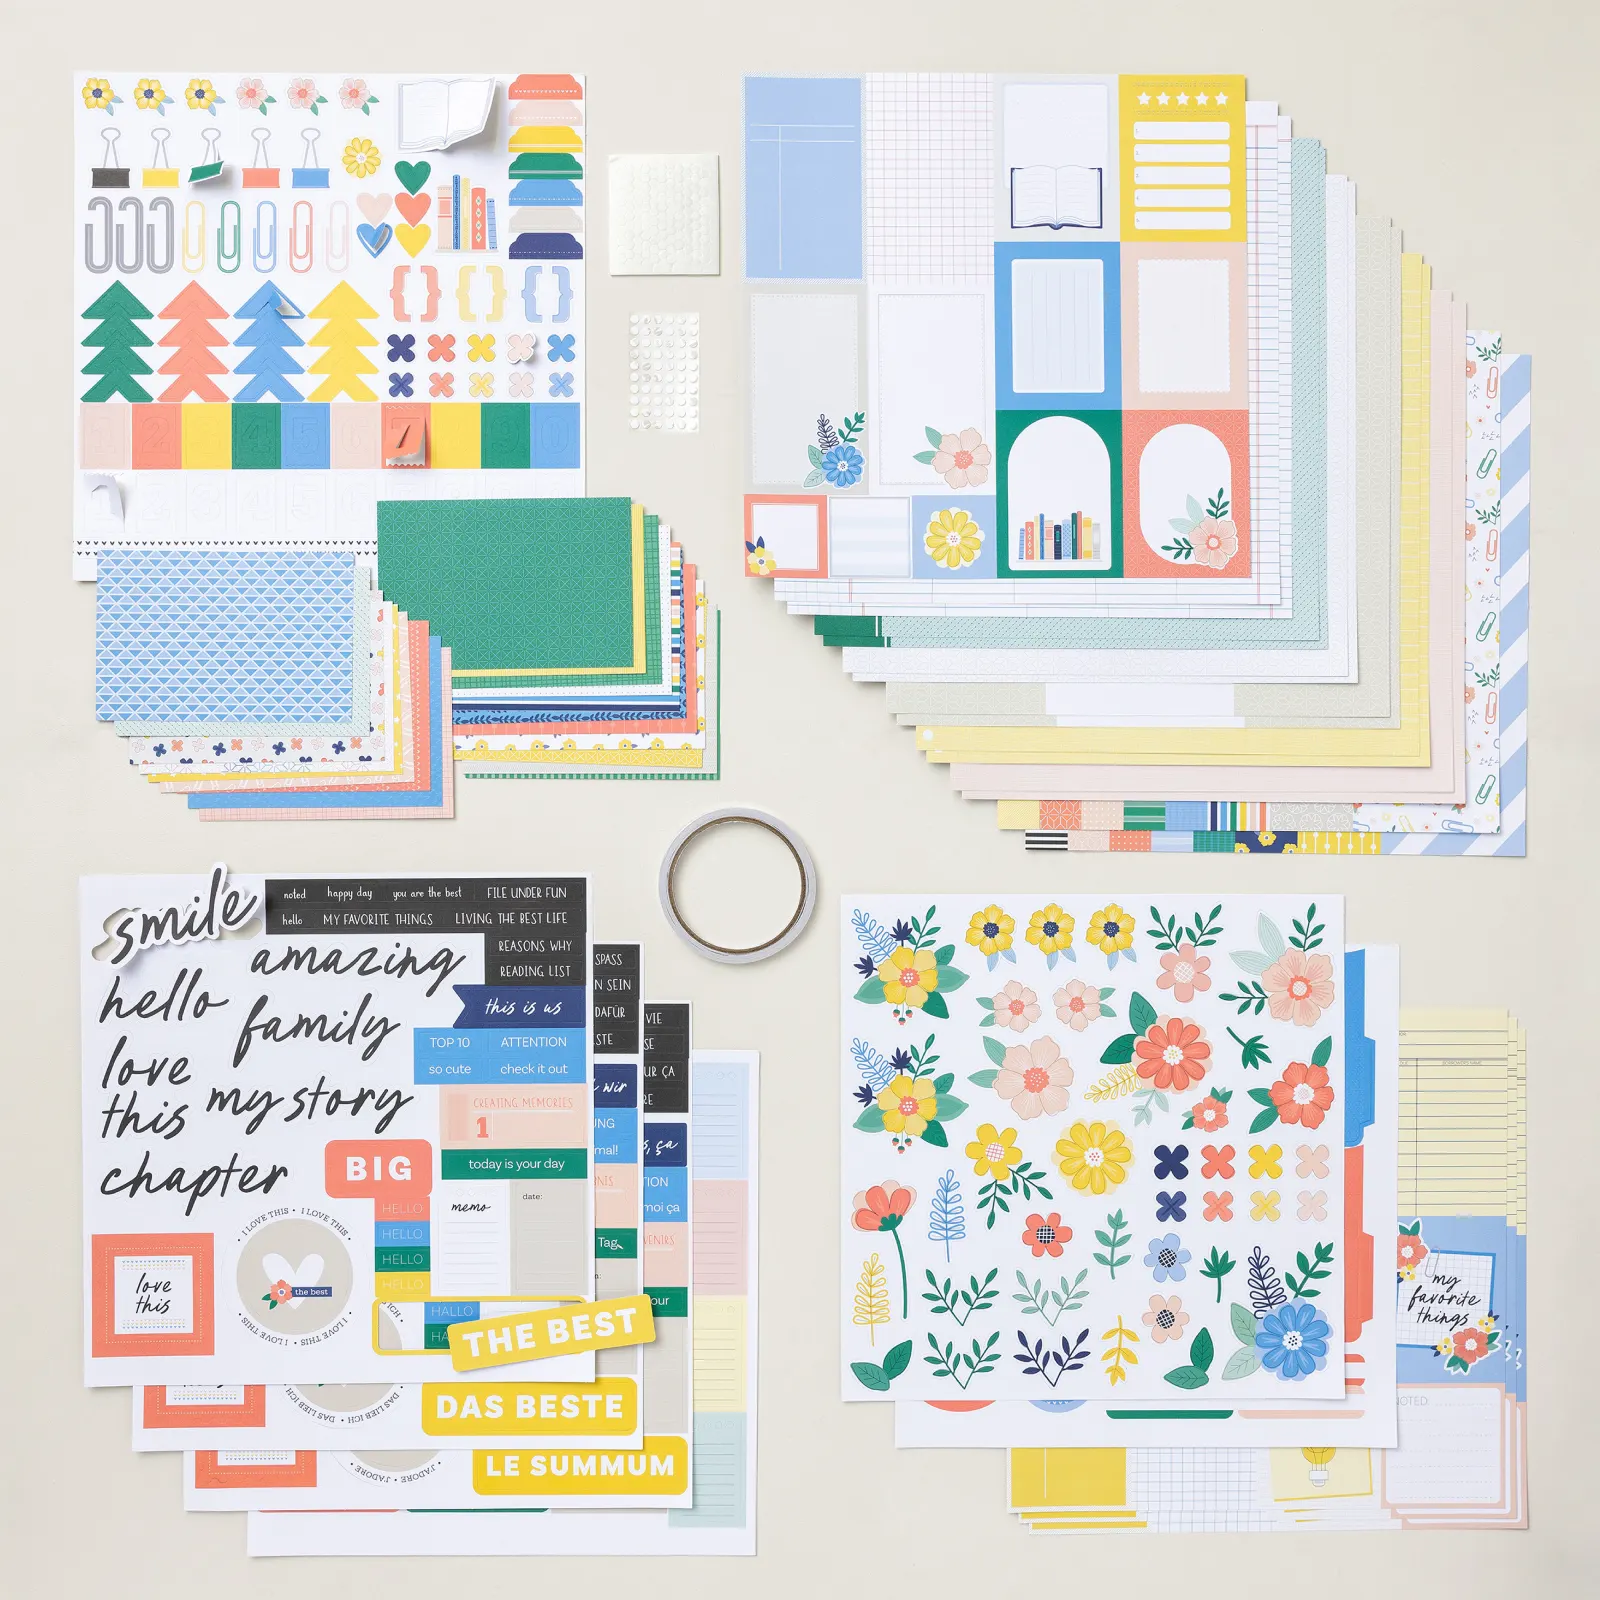
It includes the following:

Step-by-step instructions

-12 sheets of single-sided Designer Series Paper

-4 sheets of precut images and phrases & 4 sheets of cut-apart designs

-20 colored and patterned 4″ x 6″ cards

-1 sheet of printed stickers

-8 yards (7.3 m) of Tear & Tape Adhesive, 100 Mini Stampin’ Dimensionals & 50 Mini Glue Dots

Here’s a photo of the kit elements:

Whether it’s card making or scrapbooking; our Kit Collection will have what you’re looking for. See it all here.

April Specials:

Check out the Last Chance list here; these items go fast!

Product of the Month is the Eyelet Blooms dies

*Get a free 12 project tutorial when you redeem this POM from me!

~~~

Free PDF tutorial featuring the Delicate Whispers suite!

All Posts

  • Curvy Christmas & the Postage Punch


    Check out this easy card using the new Curvy Christmas stamp set and the Postage Punch!  

    It's super simple! Here's how I made it:

    1. Stamp the curvy trees image on the White CS using Shaded Spruce ink.  Color the trees with a Light Shaded Spruce Blends marker.  Add a tiny star using Cherry Cobbler ink on one tree. Adhere it to the Cherry Cobbler layer and to the main card.
    2. Punch out three pieces of Classic Christmas designer paper with the Postage Punch seen here.  Adhere to the White CS. 
    3. Stamp the greeting in Cherry Cobbler ink on a 1/2" strip of White CS.  Punch the ends with the Banners Pick a Punch. Add it to the card with mini dimensionals. 
    4. Finish with a few Holiday rhinestones. 

    You can see this stamp set here; it's only available through January 4th.  And the Classic Christmas Designer Paper is here while supplies last. 

    Remember that everyone who orders any of these products or places an online order with me in November will receive a free 22 project PDF tutorial featuring the Curvy Celebration products! 


    ~~~

    November Specials!

    Current Host code is GRC9VVUU


    All online orders receive my FREE Curvy Celebrations 22 project PDF Tutorial! 

    Leave a Reply

    Your email address will not be published. Required fields are marked *

  • Gift Wrapped Box Fold Card with video


    Check out this cute Christmas card we made at my October Card Clubs!  It's a box fold card; a super cute but easy fun fold. 

    The colors are Real Red with Granny Apple Green & White. The dies on the front are the Stitched Shapes and Hippos & Friends.

    It even folds flat for mailing!  As you can see the back is similar to the front; leaving some space to write or sign the card.  

    I used the Gift Wrapped punch bundle from the Holiday catalog.  You can see it here. 

    Check out the video and measurements below. 

    Here's the video: 


    Measurements:

    Real Red 4 1/4" X 11" scored at 5 1/2", 7", 9" and 10 1/2"
    Granny Apple Green 3 5/8" X 4 7/8" (2 pieces) plus scrap for die-cut
    Whisper White 3 1/2" X 4 3/4" (2 pieces) plus scrap for circle die-cut and bow

    ~~~

    November Specials!

    Current Host code is GRC9VVUU


    All online orders receive my FREE Curvy Celebrations 22 project PDF Tutorial! 

    Leave a Reply

    Your email address will not be published. Required fields are marked *

  • Peaceful Nativity WOW card


    Look what happens when you combine a beautiful background with the Nativity Dies?!  

    Candace created this gorgeous card for our October Christmas cards swap with my Flowerbug's Team.  She is a master at sponging backgrounds.  I believe she used Pacific Point here.  She simply added a greeting (from For Unto Us set) embossed in Silver and the pretty scenic die-cuts in Black.  

    Click here to see the For Unto Us stamp set and here for the Peaceful Nativity bundle. 

    More Team swaps tomorrow! 

    ~~~

    November Specials!

    Current Host code is GRC9VVUU


    All online orders receive my FREE Curvy Celebrations 22 project PDF Tutorial! 


    Leave a Reply

    Your email address will not be published. Required fields are marked *


Notice: LeeAnn Greff, Independent Stampin’ Up! Demonstrator, Manager. The content of this website is my sole responsibility as an independent Stampin’ Up! demonstrator and the use of, and content of, the classes, services, or products offered on this website is not endorsed by Stampin’ Up! Copyright 2025